Information about the new iCube series from Sculpfun. Sculpfun goes against the trend of bigger and stronger devices with the iCube and introduces a device that has less power than older generations: 3W. However, the resolution is significantly higher than the more powerful systems. Since the working surface of the iCube is also smaller, it is particularly suitable for small, delicate work such as decoration or jewelry. The device is also much more portable and can simply be placed on a table surface, for example, to engrave something.
If the iCube freezes for a brief moment during or at the start or end of a level, you should make sure that the “Air” option in LightBurn is switched off for all levels. Some firmware versions seem to have a problem here. Since no Air Assist is connected, this can be permanently set to “off”.
Update: The iCube has arrived, from now on, you can find all the information I can gather on this page.
Update 2: There is a FAQ section added at the end of the page that was provided by Sculpfun to address some of the frequent questions (most of them are covered in the following guides already)
Update 3: The firmware files for the iCubes are available. In case you experience any issue, you can try to re-flash: MV1.0-version and QV1.0-version (depending on mainboard, see notes below).
Technical specifications
Here is an overview of the technical data. The 10W variant is not yet available at the beginning and will follow soon.

| Standby | 16 W (power supply alone 6W) |
| all motors at full speed | 22 W |
| all motors at full speed, laser at 100% | 36 W |
Assembly / Setup instructions
Quick Links:
Sculpfun firmware flash and WLAN setting tool: Download
Manual: Download
Mechanical checks
Even if the model is delivered fully assembled in principle, the mechanics still need to be checked. The axles in particular need to be set precisely if you really want to use the high speeds. On my model, the contact pressure of the rollers was too low on one axle and too high on the other. So test carefully here. This article also explains exactly how to adjust the mechanism. The eccentric nuts can be readjusted with the supplied open-end wrench until the carriages no longer wobble, but also do not run uneven when you move them manually.
The easiest way to do this is to unscrew the lid.


It has also been reported several times that the home position could not be reached because the cables were too tight/short. Therefore, check whether the cables have enough play so that the head can move freely up to the limit switches.

Another problem that is not uncommon, unfortunately, is that the frame is not mounted perfectly perpendicular. This will lead to objects not being square but rhomboidal (picture 1). You can adjust this by completely removing the complete mechanics first, then removing the x-axis beam, and finally, you can reach the screws to adjust the angle of the y-axis beam (also see videos below).
Sculpfun created a series of videos explaining how to deal with the most common issues:


Mounting laser head
The only part that still needs to be fitted is the laser module. I recommend removing the cover once, as it is much easier for the first time if you can see the cables clearly. First of all, the locking screw must be screwed into the bracket, if this has not already been done. The laser module is then pushed into the guide from below and secured with the screw. Finally, the signal cable is plugged in at the top. It only fits in the correct position.


Focussing
To obtain the correct distance to the workpiece, the guide gauge is folded out of the module and the module is lowered or raised until the gauge rests straight on the workpiece. Then tighten the screw.

Exhaust
The iCube’s filter is small and cannot filter all gases sufficiently to operate it indoors for long periods. It is therefore advisable to create an extraction system. As described in the article on housings, you can easily use air hoses from air conditioning systems etc. for this. I have created an adapter with which you can attach an appropriate hose. Attention: the small fan is probably not strong enough to blow the air through a very long hose, it is definitely recommended to attach another fan in the middle or at the end of the hose to support the small fan.
The file can be downloaded here: Download (the nozzle is intended for 100 mm hoses) or at Thingiverse. I created the model rushing, and it is not quite optimal. If anyone has developed improved versions, I would be happy to include them here. – Nico already created some additional models, with different angles and hose sizes: download (Printables).
Sculpfun will probably also release a suitable filter system, but it is not yet available.


Software Setup
Though you can use the laser with a small iOS/Android app, this does not make much sense in my opinion. The app is nice for a quick project, maybe, but you nearly have no control over detailed settings. The usual way to work with the iCube is either using LightBurn or LaserGRBL. A complete setup guide is here: Setting up the software. You can follow all the steps listed there, the iCube basically works the same as bigger lasers. In short:
- Install the CH340 usb driver
- Check which COM port the laser gets assigned
- Connect to the laser using LaserGRBL or LightBurn
- In case of LightBurn, add a new laser device, type “grbl” (nothing else)
- Set your workspace size
- Start having fun! 🙂
The settings are analogous to any other laser, so the settings guide also applies here as well.
Workspace
It is best to test the possible working area yourself. My model (one of the early models) has a working area of 129 × 129 mm, not 130 × 130 mm as stated! Just move the laser in tiny steps to the end of the workspace, until it hits the frame. The last position before hitting the frame is the maximum workspace size. Please note that if the laser hits the frame, it will lose its exact position and projects will no longer be executed correctly. You can easily correct this by changing the two values in the console:
$130=129
ok
$131=129
ok
I then had the working area drawn on a scrap piece of wood so that I could see a little more precisely where it was. As expected, the area is not centered in the laser, but shifted slightly to the left (the module is on the left of the mechanism). The origin is front-left, as usual.


Wi-Fi
Here is everything you need to know about the Wi-Fi. As is usual with such controllers, there are two modes in which the board can be operated: alone (the controller opens a Wi-Fi that you can dial into, called an AP (access point)) and as a normal Wi-Fi client (STA, station). You can use both modes, functionally there is no difference. The Wi-Fi is controlled via three parameters.
$50: Wi-Fi mode, 1 means AP mode, 2 means STA mode
$53: Wi-Fi name (probably no special characters possible)
$54: Wi-Fi password (no special characters possible)
If nothing has been set yet, the iCube is in AP mode. You should find a Wi-Fi with the name “Sculpfun-iCube” or similar, the password is “12345678”. Once you have dialed in there, you will find the laser under the IP address 192.168.4.1.
It appears that you cannot use special characters (as is often the case with ESP controller firmwares), so it is advisable to use a second Wi-Fi or a guest Wi-Fi if you would rather not reduce the security of your Wi-Fi. If you have connected to the laser normally via USB, you can set these parameters. It is advisable to set $53 and $54 first and then $50, as the laser immediately switches the connection as soon as $50 is saved. Enter the following in the console:
$53=WIFI SSID
ok
$54=WIFI PASSWORD
ok
$50=2
E (433298) wifi_init_default: esp_wifi_get_mac failed with 12289
[MSG:Wifi Connecting...]
[MSG:Wifi Connected]
ok
[MSG:Start mDNS with hostname:http://SCULPFUN-WEB.local/]
[MSG:HTTP Started]
[MSG:TELNET Started 8080]
ok
The laser can then be accessed via http://SCULPFUN-WEB.local/ in the browser.
Alternatively, you can also connect to the Sculpfun tool and enter the data there:

If you want to know the IP address of the laser, you can simply establish a USB connection with LightBurn, for example, where it is also output:
Waiting for connection...
ok
[V4.00(8M.H35.20231010)]
[VER:1.1h.2023101002:]
[OPT:VMPH,63,256]
Target buffer size found
[MSG:Using machine:iCube]
ok
[MSG:Mode=STA:SSID=xxxx:Status=Connected:IP=192.168.30.102:MAC=A8-42-xxxx]
ok
App Control
If the laser is connected to your Wi-Fi and you know the IP address, you can now also connect via app and control the laser. I only tested this briefly, but it worked perfectly.


Laser head
The laser module has become significantly smaller compared to its predecessors. It also has the focus gauge directly integrated. The head is very lightweight, it weights about 155 g. Here is a comparison with its “big” brother, the S30 5W:


Here is a comparison of the laser dot size / accuracy test as well as cutting:


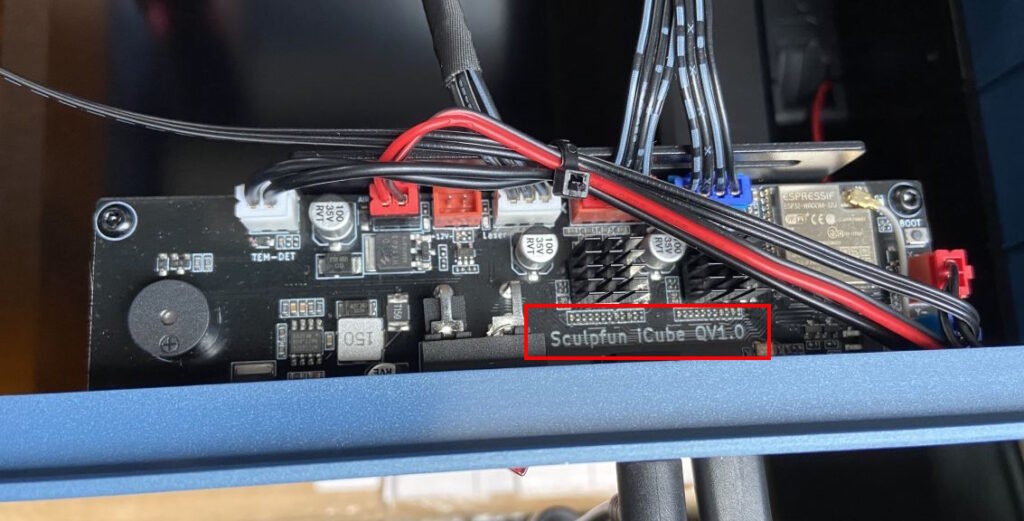
Mainboard
The mainboard is a scaled-down version of the S30 mainboard. New features include a USB-C socket instead of the old USB-B port. The board is very reduced, there are no longer many connection options. However, a controllable Air Assist connection is available (to be controlled as usual with M8). A small buzzer is also onboard.


Since the Air Assist port is right next to it, you could use it to control the fan of the case (which of course makes very little sense). This is just a test to see if the port works.

Using a rotary
In principle, it is possible to connect a rotary to the iCube just like any other laser. The brand doesn’t matter as long as the drive is a stepper motor (and as far as I know, they all are). There are only two special features / challenges with the iCube:
- The iCube offers little space to place the Rotary in the housing, and even if it fits, there is hardly enough height to engrave more than pins. ⇒ The Rotary has to be placed under the iCube, you need a stand.
- The connection must be made directly to the mainboard, as the stepper motors in the iCube are of type Nema 14 and have different connectors to the Nema 17 motors of the large lasers. ⇒ You need a suitable cable. (The connector for the mainboard must be a four-pin JST-XH 2.54 connector.
Otherwise, the procedure is exactly the same as described here: Article on rotary rollers. It also tells you which settings to choose!
There are small rollers that even fit into the housing, but then the height is very limited. With my Comgrow-Rotary, the maximum diameter of the objects is about 2 cm, which is just about enough for thick pins, but no more.


Here is another solution, done by Ricardo:


Firmware Update
The update process is described in more detail on the firmware update pages. You can use the Sculpfun Tool you already used for Wi-Fi setup to flash a new firmware version. In the case of the iCubes, the firmware is dependent on the mainboard version, make sure to flash the correct one, MV or QV:
Firmware Settings
Here you find a list of the factory firmware settings (click to expand):
Firmware settings table
| Number | Value |
|---|---|
| $0 | 10 |
| $1 | 25 |
| $2 | 0 |
| $3 | 4 |
| $4 | 0 |
| $5 | 1 |
| $6 | 0 |
| $10 | 1 |
| $11 | 0.010 |
| $12 | 0.002 |
| $13 | 0 |
| $20 | 0 |
| $21 | 1 |
| $22 | 1 |
| $23 | 7 |
| $24 | 1500.000 |
| $25 | 3000.000 |
| $26 | 250.000 |
| $27 | 3.000 |
| $28 | 1000.000 |
| $30 | 1000.000 |
| $31 | 0.000 |
| $32 | 1 |
| $40 | 1 |
| $41 | 1 |
| $42 | 0 |
| $43 | 0 |
| $44 | 1 |
| $45 | 0 |
| $46 | 1 |
| $47 | 0 |
| $50 | 2 |
| $51 | Sculpfun iCube (AP mode SSID) |
| $52 | 12345678 (AP mode password) |
| $53 | SSID (SSID to connect to in client mode) |
| $54 | Password (Password in client mode) |
| $100 | 80.000 |
| $101 | 80 |
| $102 | 100 |
| $103 | 100.000 |
| $104 | 100.000 |
| $105 | 100.000 |
| $110 | 10000.000 |
| $111 | 10000.000 |
| $112 | 6000.000 |
| $113 | 1000.000 |
| $114 | 1000.000 |
| $115 | 1000.000 |
| $120 | 300.000 |
| $121 | 300.000 |
| $122 | 500.000 |
| $123 | 200.000 |
| $124 | 200.000 |
| $125 | 200.000 |
| $130 | 129.000 (mine has 129 mm max travel) |
| $131 | 129.000 (mine has 129 mm max travel) |
| $132 | 50.000 |
| $133 | 300.000 |
| $134 | 300.000 |
| $135 | 300.000 |
Images
Here are some images of my model.


And here are some of the outstanding results Hick and Sticks produced using the iCube:


Official Images


Videos / Reviews
Official unboxing and setup:
Frequently asked questions
This section covers a list of frequently asked questions provided by Sculpfun. Most of them are already covered by the guide above, I think.
- Why is there a gap between the acrylic cover and the fuselage, and it doesn’t fit perfectly?
- The gap between the acrylic cover and the fuselage is to provide an air inlet for the filter device.
- Will the acrylic cover be easily damaged during transportation?
- The acrylic cover was conducted a drop test in the lab. It will not be easily damaged under normal use, but it may cause damage during transportation. If you received the damaged acrylic cover , please take a photo or video and send it to our after-sales email support@sculpfun.com. Once we confirmed it was damaged due to transportation,we will reissue a new one.
- Why can’t the eccentric nut be adjusted?
- Please don’t tighten the M5 screw and lock nut too much at the same time, as this will cause the eccentric nut to lose its adjustment function. We are preparing a video about eccentric nut adjustment, you can always follow our YouTube: https://www.youtube.com/@SCULPFUNReal/videos
- Why is the machine I received missing some accessories, where can I buy it?
- If you find that the accessories are missing when you receive the package, please contact our after-sales customer service email support@sculpfun.com, and we will reissue the missing accessories to you.
- I did a wall test and an accuracy test, why does the beam look rectangular, but the result is not? I want to use 20% and 90% power to engrave an aluminum plate.
- The laser spot size is a nearly rectangular spot, not a square. Therefore, the Y-axis cutting ability is relatively weak, and the cut is larger than that of the X-axis. It is recommended to use 1000 speed and 40% power to engrave aluminum plates.
- Why can’t my iCube connect to Wi-Fi? When I try to get an IP address, nothing happens; when I try to connect to my home Wi-Fi, I get a confirmation but can’t connect?
- Please only choose one software to connect. Don’t open multiple software on the computer at the same time (for example: light burn, LaserGRBL, Sculpfun Laser Tool, etc.). Multiple software programs are opening at the same time will cause a connection error or failure, in this situation, you need to restart the machine and replug the data cable.
- How to get an IP address:
① Re-plug and unplug the USB data cable on the computer;
② Open “Sculpfun Laser Tool” on your computer and click “Wi-Fi Configuration Tool”;
③ Select the correct COM serial port to connect (if you are not sure what your serial port is, you can check the “CH340 serial port” in the “Device Manager” of your computer);
④ Enter the Wi-Fi name and password, click “Connect Wi-Fi”, and click “Get IP” to obtain the address (note: only supports Wi-Fi with 2.4G frequency). - How to connect to home Wi-Fi:
① Check whether your mobile phone and computer are in the same LAN and connected to the same Wi-Fi (Note: If the mobile phone and computer are not in the same LAN or do not use the same Wi-Fi, the connection cannot be made);
② Enter the IP address on “Sculpfun Laser Tool” to connect successfully. If you need web control, please enter the IP address on the web page to enter the web control page. - Please pay attention that if the network is not good, or you are in an area with a lot of signal interference, high PIN ,then command may be delayed.
- We are preparing a video about the connection method, you can follow our YouTube: https://www.youtube.com/@SCULPFUNReal/videos
- iCube is not equipped with a focusing tool, how can I adjust the distance between the laser and the material?
- There is a focusing column on the left side of the iCube laser head. The focusing distance is 40 mm. Loosen the screw on the right side, place the laser head at a suitable height, tighten the screw, and retract the focusing column. (Note: When carving objects of different heights, you need to refocus to ensure the working effect.)
- Why can’t I connect to my home Wi-Fi?
- First, please make sure the frequency of the Wi-Fi you want to connect to, iCube only supports connecting to 2.4G Hz Wi-Fi; secondly, you need to check whether your home Wi-Fi password contains special symbols (% * & / @ ! …). If your Wi-Fi password contains special symbols, please change your password; otherwise the software will regard the special symbols as certain commands when using GRBL/LightBurn, which will cause the engraving machine to malfunction.
- How to connect to iCube using AP Wifi mode? What are the advantages and disadvantages of using AP Wifi mode?
- The connection steps are as follows:
① The machine defaults to AP wifi mode when it leaves the factory. The machine will automatically transmit Wifi after it is turned on;
② Connect to the machine Wifi through your mobile phone. The Wifi name is “SculpFun iCube XXXXX” and the default password is: 12345678;
③ Enter the default IP address “192.168.4.1” in SculpFun APP to connect to the APP. - Advantages: After connecting, the IP address will always be fixed as “192.168.4.1”, and there is no need to query the machine’s IP address anymore.
- Disadvantages: Since the machine itself emits Wifi, the connected device will not be able to access the Internet during operation.
- The connection steps are as follows:
- How to connect to iCube using Wi-Fi mode? What are the advantages and disadvantages of using Wi-Fi mode?
- The connection steps are as follows:
- ① When using it for the first time, the machine needs to be connected to the computer using a data cable;
- ② Open the Sculpfun homepage on your computer, download the Sculpfun Laser Tool configuration software, and click “Wi-Fi Configuration Tool”;
- ③ Enter the name and password of your home Wi-Fi on the software (Note: Please ensure the Wi-Fi frequency you want to connect to, iCube only supports Wi-Fi at the 2.4G Hz frequency; you need to check whether your home Wi-Fi password contains special symbols (% * & / @ ! …). If your Wi-Fi password contains special symbols, please change your password; otherwise the software will regard the special symbols as some kind of command when using GRBL/LightBurn, which will cause the engraving machine to malfunction.);
- ④ After the machine is connected to Wi-Fi, click “Get IP” in the software to obtain the current IP address;
- ⑤ Enter the queried IP address in Sculpfun APP to connect.
- Advantages: While operating the machine, the connected device is not restricted by the network and can access the Internet normally.
- Disadvantages: The IP address may change every time you turn on the phone, and you need to re-insert the data cable to obtain the IP address. You can avoid this problem by binding the IP address in the background of the router.