The most common question in all forums and especially Facebook is “What settings do I need for my project?” However, you can only answer the question yourself. Foremost, no one can know what the result should look like exactly. Brighter? Darker? Everyone has individual requirements and expectations. And it comes to the fact that every material is different. Any laser as well. And really from single piece to piece. I read reports almost daily that one plywood panel worked great and the next one from the same package didn’t. These are natural materials and there are also many differences in processing. Therefore, there can be no general settings that always work.
There are no universal settings!
As I said at the beginning, no one can provide settings that are perfect for your project. You have to find out for yourself. Of course, you don’t have to start from scratch. You can already follow the results and experiences of others, but only as a starting value. That means, you have to test until you like the result. After reading this page, you should have a pretty good feeling for the first shots, the rest comes through experience.
General remarks
Basically, you should be clear about what you can expect from the laser. Diode lasers are slow. If you want to work faster, you have to use a CO₂ laser. The unit in which diode lasers measure is millimeters per minute. CO₂ lasers measure in millimeters per second, which is 60x faster.
The usual diode lasers with relatively the same basic mechanics are designed for speeds up to about 5,000-6,000 mm/min. Diode lasers with improved mechanics can reach up to 10,000 mm/min and more (though, speeds above 25,000 mm/min are very unrealistic, even if the manufacturer advertises it). However, these speeds can only be achieved when engraving, as not that much power is required there. When cutting, speeds of 100 to 800 mm/min are common. In addition, several passes are necessary then. At high speeds, other effects such as vibrations also come into play, which can negatively affect the result. In case of doubt, it is better to try more slowly (especially at engraving), but still as fast as possible.
The power of the laser is usually regulated by a percentage value. Foremost, it can be said that the laser should never be operated for long periods at 100% power (it depends less on the actual power than on the temperature of the module. Temperatures above 30 °C make the diode age strongly and break down faster). A more elaborate description of this effect can be found in the FAQ section. As a rule of thumb, you can say that you should not use more than 85 – 90% power. This power level is typically only needed when cutting. Engraving uses the whole bandwidth of 10 – 80%.
More power does not necessarily mean a better result either… When cutting, it is not advisable to set the power to 100%, set the speed and go. If you use too much power, you’ll char the wood extra badly. When the laser comes back, it has to burn through the charring first to get to the untouched wood. So, that means more work for the laser. Therefore, it may be advisable to use less power and more passes.
There is technically no difference between cutting and engraving. It’s not different for the software, so you can’t select a “cutting” function or an “engraving” function. What makes the difference is the power. If the laser is set strong enough, it will burn the material deep enough to “cut”, if it is set weak enough to only burn the surface, it will “engrave”. So in the software the setting is a “line” in both cases, but once with 80% power and multiple passes (then the material is cut) or with 20% power and only one pass, then it is engraved.
Dangers
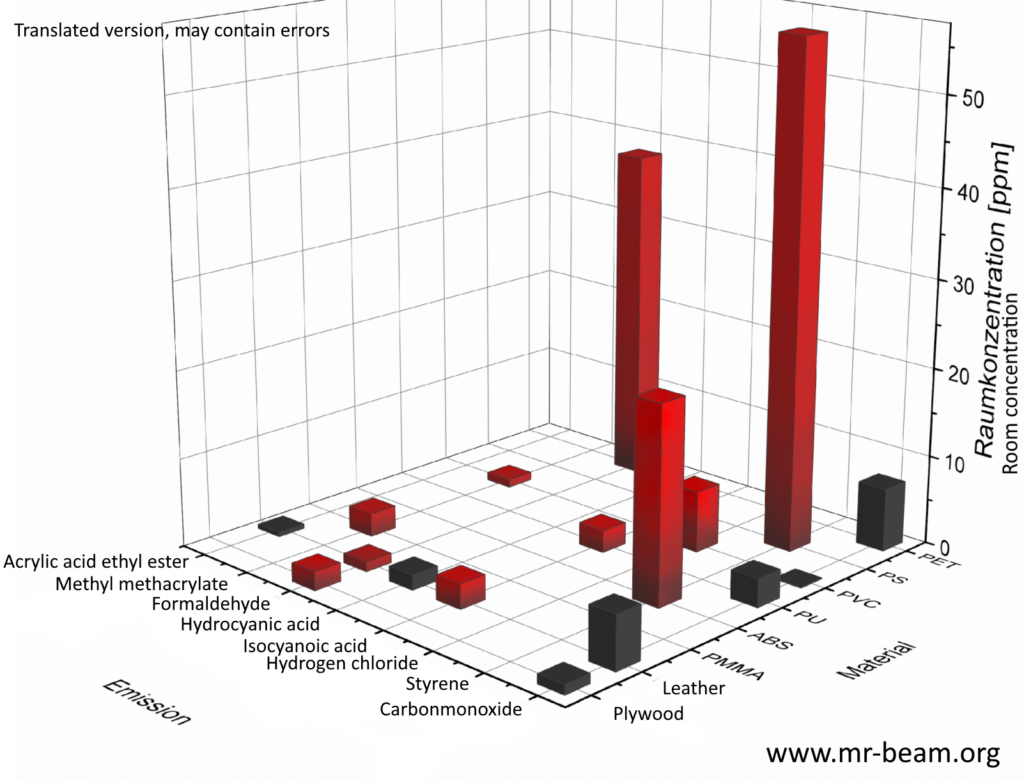
Many substances are extremely dangerous when burned. You should pay close attention to which substances you put under the laser. None of them is healthy, not even wood, but the dangers vary. One should always make sure that all gases are extracted and filtered or directed outside. Of particular note here are any fabrics with PVC (including vinyl), which should never be lasered. Here are a few more examples:

Relationship between speed and performance
For the final result, the energy input into the material is ultimately decisive. The more power is concentrated on one point, the more material is burned. It depends on the energy per time and area. When the laser moves over the surface, a certain energy per time is applied to the material. If you drive faster at the same power, less energy is distributed over the same area per time (the laser is only shorter “there”). As a result, proportional settings can be used. In other words, 80% performance at 1000 mm/min should produce about the same result as 40% performance at 500 mm/min. The power per area per time is the same (this is ultimately not absolutely true and materials do not react linearly to the energy, so this is only to be understood as a guideline).
At some point, you can’t compensate for the increase in speed with more power. In this case, you increase the number of passes. The laser will pass every spot multiple times and cut or engrave deeper this way.
As a guide – the faster you go, the less charring you have at the material. If you cut a piece of wood either with 200 mm/min at 80% in two passes or using 600 mm/min 85% in 8 passes (just as an example), the first one will have much more charring and burn marks along the cutting path. So if you want to have a clean object, go faster and use more passes. That doesn’t mean you have to be slower with it, either. Trish from the Facebook group did a test and lasered 3 mm MDF with the following settings:
- 200mm/min, 80% power, 4 passes. Time: 1:38h.
- 600mm/min, 70% power, 10 passes. Time: 1:17h.
The result also looks nicer at 600 mm/min, the edges are not so charred. Daniel also did some additional tests and the results indicate that the behavior is close to being linear, meaning that you can choose either 200 mm/min and 2 passes or 400 mm/min and 4 passes. Which also means that the required time is nearly identical. At higher speeds (since you have less charring the lasers needs to burn through) you can even save time (e.g., 200 / 2 passes and 1000 / 9 passes instead of 10 passes: 10% time reduction). Here is another test that I did myself:

Degradation of laser performance
Many users notice in between that the performance of the laser decreases. This is usually because the laser has not been sufficiently maintained. Dirt particles collect on the lens during lasing. On the one hand, this leads to a decrease in power, but more importantly, the lens is destroyed after a short time! The dirt is heated by the laser beam and causes the lens to crack. Therefore, clean regularly! This is described in the chapter on maintenance. Another reason can be that the diode was operated too long with too high power, which also makes it age faster.
Focus
Normally, the laser is focused directly on the surface of the workpiece. There, the laser dot is then smallest and perfectly aligned. The area in which the focus is optimal is already considerable with Sculpfun lasers, but not infinite. Around the focus point, the laser cone becomes larger and the cutting performance correspondingly poorer. For thicker materials, it is therefore advisable to adjust the focus. The rule of thumb is to place the focus in the center of the material. So, for a 10 mm thick wooden board, set the focus 5 mm deeper than the surface. This usually gives the best results. But again, you have to experiment until you find the optimal setting.
You can also use this method the other way around. For engravings, you can set the focus higher than normal and get a thicker and darker engraving due to the thicker laser dot. Of course, you then lose some resolution, since the dot no longer has its original size.

Here are the standard focus distances of the models I tested:
| S6, S9 | 20 mm |
| S10 | 50 mm |
| S30, S30 Pro (5W, 10W), S30 Ultra 11W | 50 mm |
| S30 Pro Max (20W), S30 Ultra 22W, 33W, iCube Pro | 40 mm |
| Atomstack S20 / A20 / X20 Pro | 4 mm (with shield), 38 mm (without shield) |
If you lost the focus helper, you can easily create your own using the laser. Here is a file with some examples: Download (LightBurn file). Of course, you can create different heights / shapes as well.

Dynamic vs. constant power
Note
Dynamic power is a feature of grbl firmware version 1.1f. In earlier versions, it was not available. If you don’t see the option in LightBurn, you may have added your laser incorrectly (or auto-detection did not work). The device type of the laser needs to be “grbl”, not any other type.
You can select whether you want to work with constant or dynamic power in the power or detailed layer settings. When should you use which setting? As always—it depends. In general, however, it can be said that constant power should be used for cutting and dynamic power for engraving.
In short, dynamic power means an adaptation of the power to the speed. At the end of a line/curve, the laser must decelerate. With dynamic power, the power is also reduced with the speed, so that at the end of the movement there is no stronger burning than on the rest of the movement. See the relationship between speed and power—with the same power and slower speed, more energy per area is brought into the material. Corners would become darker than long straight lines. This is bad for engraving, since it is usually supposed to be very uniform. Therefore, the dynamic power is typically used here.
Constant power does not adapt the power to the speed. This is often relevant, especially when cutting because otherwise small, filigree, or sharp corners would mean that the material would not be cut with dynamic power (because the power would decrease in the corner). Therefore, use constant power when cutting.


Detailed explanation of both modes (from grbl documentation)
M3 Constant Laser Power Mode:
Constant laser power mode simply keeps the laser power as programmed, regardless if the machine is moving, accelerating, or stopped. This provides better control of the laser state. With a good G-code program, this can lead to more consistent cuts in more difficult materials. For a clean cut and prevent scorching with M3 constant power mode, it’s a good idea to add lead-in and lead-out motions around the line you want to cut to give some space for the machine to accelerate and decelerate. NOTE: M3 can be used to keep the laser on for focusing.
M4 Dynamic Laser Power Mode:
Dynamic laser power mode will automatically adjust laser power based on the current speed relative to the programmed rate. It essentially ensures the amount of laser energy along a cut is consistent, even though the machine may be stopped or actively accelerating. This is very useful for clean, precise engraving and cutting on simple materials across a large range of G-code generation methods by CAM programs. It will generally run faster and may be all you need to use.
Grbl calculates laser power based on the assumption that laser power is linear with speed and the material. Often, this is not the case. Lasers can cut differently at varying power levels and some materials may not cut well at a particular speed and/power. In short, this means that dynamic power mode may not work for all situations. Always do a test piece prior to using this with a new material or machine.
When not in motion, M4 dynamic mode turns off the laser. It only turns on when the machine moves. This generally makes the laser safer to operate because, unlike M3, it will never burn a hole through your table, if you stop and forget to turn M3 off in time.
Cutting direction / laser spot
Many users find that the laser cuts better in one axis than the other. This is because the laser spot is rarely one hundred percent square. As a rule, it is rectangular. Therefore, the cutting performance is usually slightly better in one direction than the other. So, this is not unusual. Since you shouldn’t cut at the limit of performance anyway (see below, if you just about cut through the material, it often happens anyway that some places don’t get cut due to material differences), but this is typically not a problem. Simply make one more pass than is basically required, and this effect will no longer be noticeable.


More power in a laser module does not necessarily mean better results. The more diodes that are connected to form a beam, the thicker the laser dot becomes. Here are a few examples (with higher power, the engraving quality decreases):

This also does not necessarily mean that you can always cut better with a module with more power. The smaller the spot, the higher the energy density. A module with half the power may even cut better with a spot of less than half the size because the energy density is higher. This can be easily visualized by the focus from above. For example, if the module is placed 10 cm higher than normal, it can still fire at 33W, but since the spot is a few centimeters wide, the energy density may not even be sufficient to engrave.

Spot sizes of Sculpfun modules
| Laser module | Estimated spot size (may differ slightly) |
|---|---|
| IR-2 Infrared, iCube 3W | 0.04 mm (635 DPI) |
| S9 / S30, iCube 5W | 0.08 mm (318 DPI) |
| S10 / S30 Pro / S30 Ultra 11W, iCube 10W | 0.09 mm (280 DPI) |
| S30 Pro Max / S30 Ultra 22W | 0.12 mm (210 DPI) |
| S30 Ultra 33W | 0.20 mm (127 DPI) |
Kerf-Offset
For designs that need to fit together precisely, it is often important to know the exact width of the laser beam. Because the laser beam burns away a certain amount of the material, cut-out parts usually fit together too loosely and hold poorly. To compensate for this, there is the cutting offset. This allows the laser beam to be moved to the outside or inside of the contour so that the cutting width has no influence on the component size. The same also applies if you want parts that fit perfectly, where it depends on the tenths that the laser beam is usually wide.
The principle is explained in the following picture. The laser width is of course greatly exaggerated. An explanation in the LightBurn documentation can be found here: Kerf-Offset. The setting can be found in the detailed layer settings.

What works – what doesn’t?
Many materials are very toxic when burned. You should therefore check carefully beforehand whether the selected material is safe, or whether further precautions are necessary. There is also a lot of material on the net, such as this PDF.
Particularly dangerous are all PVC-containing materials such as vinyl (including vinyl records or adhesive vinyl) or artificial leather. This produces pure chlorine gas! Basically, the vapors are NEVER healthy, only varying from harmful to highly toxic. Despite being toxic, chlorine gas (with environment humidity) is corrosive and will destroy your laser hardware. See here for a nice article with some pictures of rotten lasers.
Natural fabrics such as wood or genuine leather can be processed without hesitation, although the fumes should not necessarily be inhaled. The same applies to paper and cardboard.
Transparent materials cannot be processed with a diode laser! This is especially true for the popular, clear acrylic glass. The wavelength of the diode laser (around 450 nm) is in the visible range, which means that if the material is permeable to the human eye, the laser beam also passes through unhindered and does not burn the material. With tricks, these materials can be engraved, but not cut! (With a CO₂ laser, on the other hand, cutting is possible due to the different wavelength)
The darker the color of the material, the better the absorption of light and thus energy. White and light materials can hardly be processed! A white sheet of paper can be worse to cut than a millimeter-thick wooden board!

Metals cannot be cut or engraved. However, you can permanently discolor (“mark”) the surface. This also requires tricks in which another material is applied and heated with the laser. Essentially, it is stainless steel, all other metals usually cannot be processed with a diode laser at all.
Explanation about different techniques taken from here
Laser Marking This is done with a low-powered beam by discoloring the material to create a high-contrast without actually disrupting the material’s surface. The marking is done via oxidation under the surface, causing it to turn black. It is sometimes called laser coloration or laser dark marking. It is most commonly used on metals, but the charring effect can also be done on plastic materials. It is typically used for serial numbers or model codes, with great application in the medical or automotive fields. Laser marking can be used on flat, curved or round surfaces.
Laser Engraving This, on the other hand, cuts a cavity through the material’s surface, leaving a cavity that reveals an image or writing at eye level that is noticeable to the touch as well. This is done with a high heat laser, causing the material surface to vaporize. It is very precise and is often a good option for people who want to personalize or customize something. Engraving depth can vary between 0.02″ in metals to 0.125″ in harder materials. You can engrave almost any type of material but are most commonly used for metal, plastics, wood, leather, glass and acrylic.
Laser Etching This is really a subset of engraving, with the main difference being the depth of the cut. This is usually no more than 0.001″ which makes it the most viable option for thin materials and small projects such as jewelry.
Stainless steel is also the only material with which colors can be created. Through different energy (=heat), the material is heated to different degrees and shimmers in different shades. James from the Facebook group has created a super example:


He also showed this in more detail in a video: https://www.youtube.com/watch?v=887CPUzYIbQ
Environmental conditions
The conditions under which you laser also play a major role. The outside temperature, humidity, etc. change the results. As a test, you can briefly immerse a plywood board in water and then try to laser with the usual settings. It will be almost impossible to cut the wood, even if it was easy before. The water absorbs a large part of the energy, which is then missing for cutting. You should therefore not store the wood outside, but always keep it as dry as possible. It may help to dry it in the oven at 50 °C for a while if it has become damp. Kim has created another nice example, here with stainless steel. The discoloration in stainless steel is caused by the temperature of the material. If the ambient temperature is different, the colors will also be different:

Natural Materials – Wood
Wood, especially plywood, is a popular material for laser cutting. But here, too, the following applies: once created, settings do not apply universally! Every piece of wood is different, even from the same batch! Especially with plywood, there are often problems that it is not cut through in some places, but in others it is. This is typically due to the glue between the layers, or that there are knotholes hidden in the layers that are not visible. Additionally, humidity plays an important role! The more water / humidity is in the wood, the harder to cut. Sometimes even impossible. If it is too humid, try to dry the wood for a few days and it will work entirely different. Here are a few examples of this:


Leather
This is an article by Eric, leather craftsman and an expert in leather usage.
Using chrome tan, or vegetable tanned leather, for laser engraving or cutting. I was asked to write an article about the safe use of leather when engraving or cutting. Genuine leather is a term that does not describe what kind of leather you talk about. And not all tanning processes are safe for leather to be heated by a laser. I know when you search the internet, you will find different opinions. So, what is the truth? I think in this case, the way to go is: what do specialists/scientists tell us? A very interesting article I found is the one from Eos Trace, a scientific magazine in Belgium. It is written in Dutch, you can use Google Translate to change it to your preferred language. The translation is not perfect. https://eostrace.be/artikelen/van-slachtafval-tot-schoen-hoe-duurzaam-is-het-productieproces-van-leer (Google-Translate-Link)
Toxicologist professor Tytgat of the university of Leuven (Belgium) wrote in this article that in Europe, these days, chrome tanned leather is tanned with chrome 3 (considered safer). In previous times, and until today in Asia and some other parts of the world, chrome 6 was used. Chrome 6 is known to cause cancer. Chemist Evert Vanecht (UCLL) adds that chromium III can oxidize to chromium VI during the production process. “And that can also happen afterward, for example if the consumer sweats in his leather shoes. (or a hat) (So, using it with the heat of a laser is certainly not safe). Chromium VI is not intentionally used during the tanning process, but can be created if the process is not properly controlled.” He refers to a Danish study, which shows that one third of the tested leather has exceeded the maximum concentration of 3 milligrams of chromium VI per kilogram. But: only regulated in Europe and some other parts of the world. And: the customer cannot see if the leather originated from a European tannery, or an Asian. Often the shops don’t even know it. In Asia, leather is still tanned with chrome 6, what is highly toxic for the workers AND the customer. Chrome 6 is related to cancer. And we all know, buying leather online makes it possible to enter a country where this normally should not be possible. The journal apache.be wrote that an investigation, in 27 European countries, showed that 13% of the leather had more than the allowed amounts of chrome 6 in it. Regarding other kinds of alternatives for leather, be careful. All synthetic leather alternatives are considered dangerous in combination with a laser. Including Leatherette. All vegetable-based leathers (they are not leather) have a base of synthetic components (for example, “pineapple leather”).
My conclusion is that you can only use vegetable tanned leather in combination with a laser. One last remark: even when using veg tan, you should invest in an enclosure and a strong exhaust fan. You never know what is used to color the leather, and burning leather gives a very bad smell (REAL bad).
Material tests
Since, as mentioned above, you cannot specify generally valid settings, it is advisable to use so-called material test files or projects to test several settings as quickly as possible. Afterwards, you can choose the best setting and continue working with it. It is recommended to carry out such tests for each new material. These files can be downloaded (original from hobbylasercutters.com, they offer files for different wattage as well) from various pages or created using an online generator, alternatively LightBurn offers its own tool for this (menu Laser Tools ⇾ Material Test Generator; an explanation video is available here). Another set of test files is provided by Xeno Works, you can download it here (see forum discussion here).
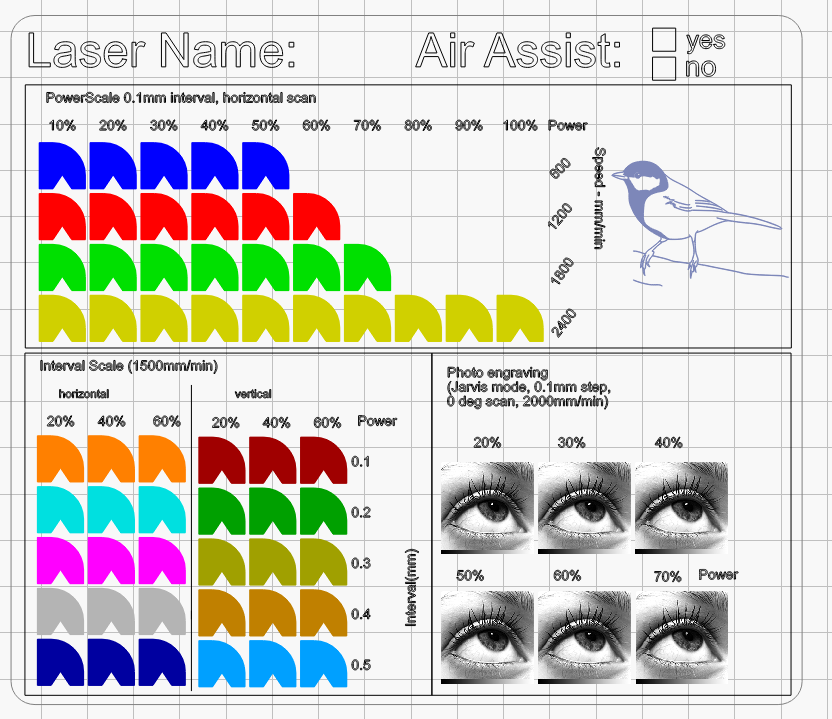

Lionel created a great online (and offline!) tool to generate various tests: https://kpc29laser.fr/

LightBurn recently created a video on how to create a material test using LightBurn:
And here is another one:
No material test possible?
If you do not have the opportunity to test the settings on a spare part or second copy, it is advisable to start with careful settings and then gradually approach. I would start with 10% power and 1000 mm/min for most materials.
Examples
Update: Sculpfun released a set of example parameters for different materials. I share them here, though I’d like to stress that those values still need adjustments to your setups and can only be used as a rough guidance. Download-PDF

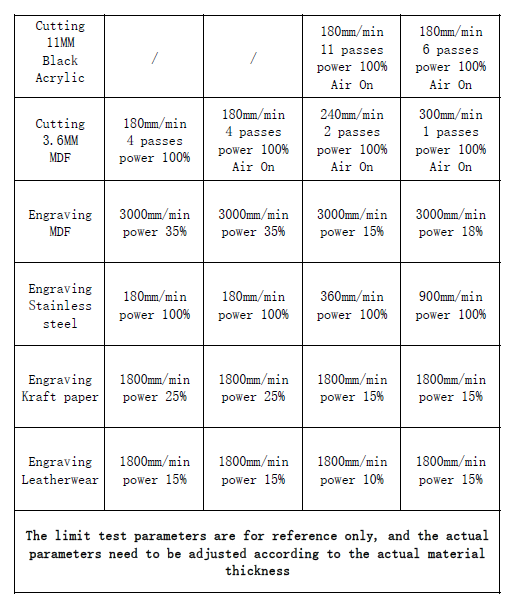
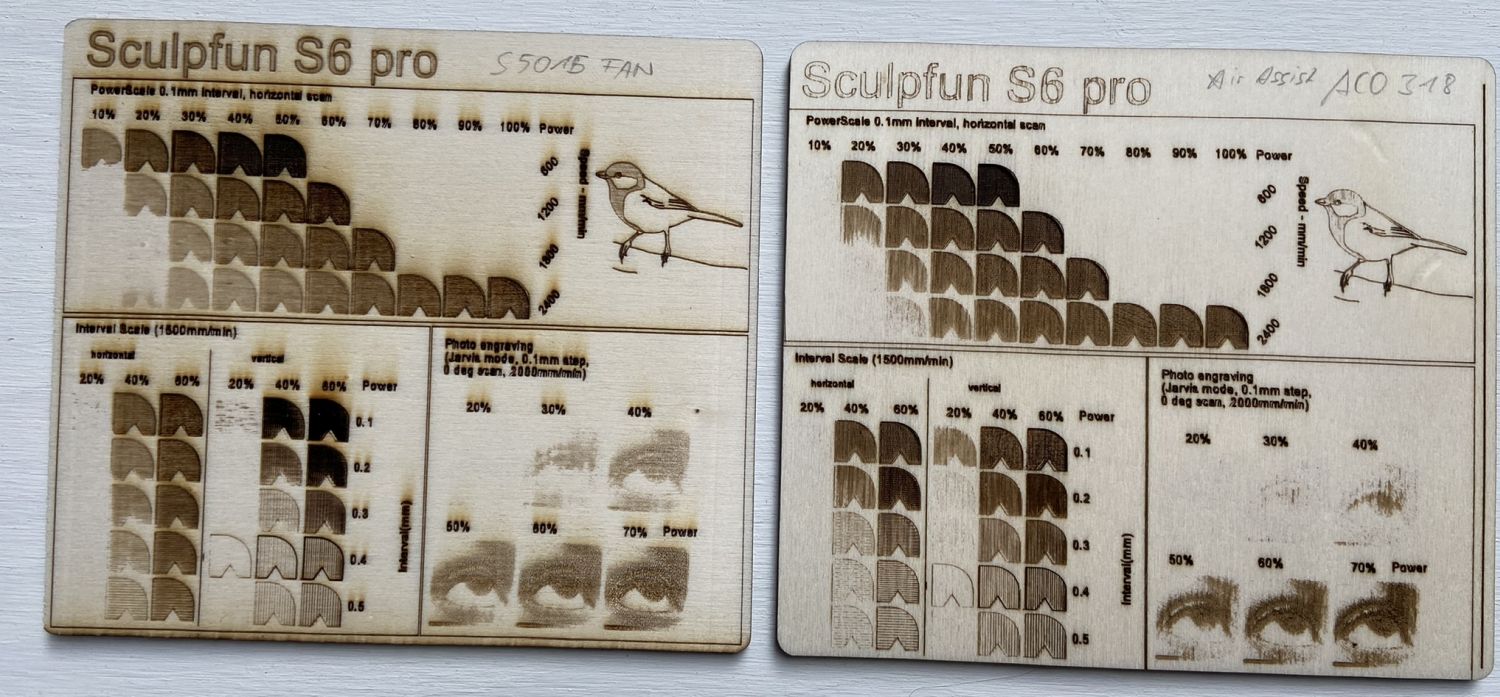
In the following, some examples will be shown, on the basis of which you can get a first impression in which area you can start with the settings. The settings are mainly related to the Sculpfun S9, with other lasers further adjustments may be necessary. The S6 Pro, for example, is slightly weaker and therefore requires more power or passes for the same result.
An Air Assist usually leads to a significantly increased performance, so that 1/3 passes can usually be saved when cutting. Engravings appear brighter with Air Assist, as not so many traces of smoke are produced. It may then be necessary to increase the power to get darker colors.
If you need more examples, I highly advise visiting the official Sculpfun user group at Facebook. There you get examples and settings for an endless number of materials and projects, which is extended every day. Be sure to use the group’s search function before asking for settings. I bet, your settings question has been asked before. 😉
| Material | Method | Typical settings / annotations |
| Plywood | Engraving | 1000-2000 mm/min 20 – 60% 1 pass |
| 4mm Cutting | 200 mm/min 85% 2-3 passes | |
| MDF | 3mm (not colored) | 800/90/7 (Speed/Power/Passes) 300/90/3 200/80/2 Results from FB. Using 10W mostly. MDF is usually stronger than plywood and harder to cut. If you can cut 10mm plywood, it doesn’t mean that 10mm MDF can be cut. I think about 6-8mm are possible then. |
| Acrylic | 5mm cutting | Only possible with opaque acrylic, ideally black 100-300 mm/min 85% 4-8 passes |
| Engrave | Clear acrylic: must be painted with paint (black). Subsequently, the black color is lasered away and leaves a burn mark (engraving). The rest of the paint must be washed off. | |
| Glass | Engrave | Like acrylic, paint with paint, laser the paint away and then clean. What remains is an engraving in the glass. 1000-2000 mm/min 60-80% |
| Leather | Engrave | Similar to wood, strong smell 1000-2000 mm/min 20 – 60% |
| Mirror | Engrave | In the case of mirrors, the back side is engraved! Therefore, the object mirrors before lasering. Do not laser the mirror side, that can destroy the diode. 1000-2000 mm/min 30-80% |
| Stainless steel | Mark | Similar to acrylic and glass, but here black marker pens or mustard are recommended as a surface treatment 800-1500 mm/min 20-70% |
| Tile | Mark | Different methods are used here. Black tiles: are painted with white lacquer, then the white lacquer is lasered away and the picture is created. The result is a white tile with a dark motif. White tiles: are coated with a paint with a high titanium dioxide content, then lasered and then washed. The titanium dioxide reacts with the surface and remains dark. 1000-2000 mm/min 0-85% |
Within this video, Sculpfun presents a method on how to set parameters for acrylic engraving. This method will also work on nearly all other materials as well. Make sure to watch it, it contains a lot of useful information (download test file):
Here is another video made by Sculpfun showing how / if it’s possible to cut thick materials:
Additional guides
Here is a great video covering roughly anything you need to know at the beginning:
I suggest having a look at Dragoncut’s YouTube-Channel: https://www.youtube.com/c/Dragoncut/videos There you find many nice tutorials about lasering techniques. Those are in German, but you can turn on subtitles in your language.
There is also a list of some settings proven to work on her homepage: https://www.dragoncut.de/tipps-und-tricks/gravur-und-schnittparameter [DE]
Louisiana Hobby Guy is also a giant resource of tutorials and information: https://www.youtube.com/@TheLouisianaHobbyGuy/featured. Here is one of those tutorials:
If you need some additional inspiration, what you can do with your new knowledge: Lydie of the Facebook group created fantastic objects using her S9: