Quick links:
S6 + S9 (old version of S9) Firmware: Download
S10 Firmware: Download (filename is a little misleading); new testing version including Bluetooth
S9 (new version) + S30 Firmware: Download (including Bluetooth) (For Bluetooth function, see some notes here.)
S30 Ultra Firmware: Download
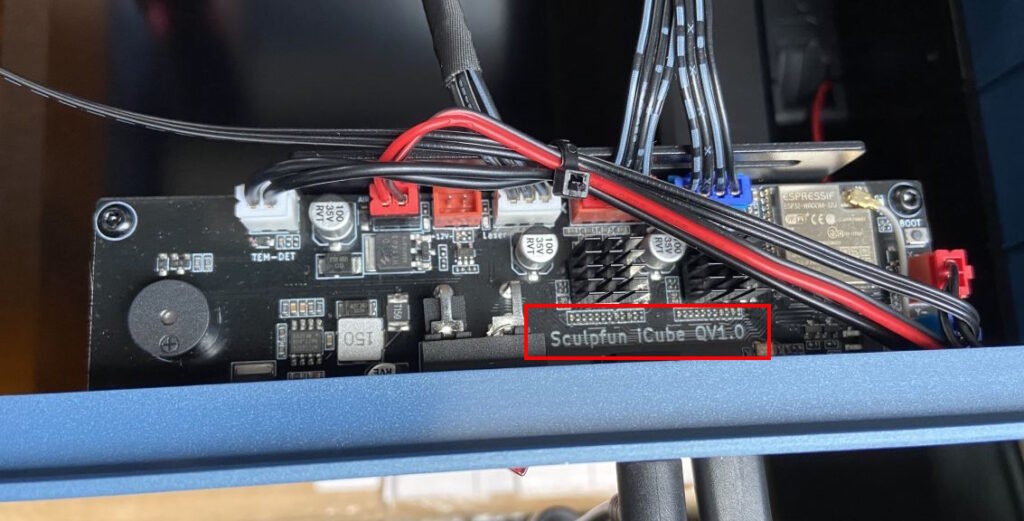
iCube Firmware: Version MV1.0, Version QV1.0 (depends on mainboard, see below)
SF-A9: Download
FluidNC configuration for MKS-DLC32 board using Sculpfun lasers: Download (not extensively tested)
FluidNC configuration for S30 board: Download
[All the listed firmware files support all features (limit switches, homing, relay control etc.)]
Great news! Sculpfun listened to the community once again and released the firmware of the S30 mainboards as open source! Check it out here: https://github.com/Sculpfun-design/S30-Series-Software-Firmware. The S9/S10 firmware can be found here: https://github.com/Sculpfun-design/S9-S10-series-Software-Firmware (for models using 32bit boards).
grbl Error messages
I created a new article about grbl error messages. If you experience any of them, have a look for possible solutions.
Attention! Newer versions of the S9 laser are shipped with the S10 or S30 mainboards. If you see any boot message containing “DLC32”, then you have one of them. You can also open the controller box and check if the mainboard has “XY-DLC32” written on it, then it’s the S10 mainboard. Follow the S10 procedure and use the according firmware. If there is a big Sculpfun Logo and a date with the “De By LYz” written on it, it’s the S30 mainboard. Then use the S30 firmware.
Limit switches: Attention! It is usually NOT NECESSARY to flash the firmware when installing limit switches!!! This is even mentioned in some Sculpfun videos, but you can always test first if it works without. Only S10 models of the first generation had a firmware bug, all following models do NOT need an update for limit switches!
The firmware is located on the control board. The controller used on most cheap laser engravers is based on an Arduino Uno architecture, since the first boards used genuine Arduino Uno boards with CNC-shields attached. Though, the microcontroller is an ATMega328 that is already shipped with an Arduino bootloader (you don’t need to take care of this technical stuff). Not only the parameters can be changed here, but the whole firmware can be exchanged / changed. Since it is an open project, anyone can make their own changes to the firmware and upload it. I recommend everyone to install the latest version of grbl (1.1h). There are several ways to do this, the easiest is via LaserGRBL (two firmware versions are already included here). But it also works via command line or Arduino IDE.
In most newer models, the ATMega328 has been replaced by an ESP32 chip. This chip is much faster and offers WLAN and Bluetooth functionality, among other things. The ESP32 chip requires a different firmware, so another section is created for it below. However, within this firmware a port of the original grbl implementation is still used, so there is usually no difference from a usage perspective.
If you need to make custom modifications to the firmware, you need to compile it using the Arduino IDE. The way how to do it is explained on the grbl wiki (https://github.com/gnea/grbl/wiki/Compiling-Grbl). If you have a standard setup, you can select the already compiled versions provided with LaserGRBL.
In case you have USB communication problems and want to dig deeper into the matter, you can also try to use the Serial Port Monitor tool, which can help with that: https://www.com-port-monitoring.com/
Myths about microcontrollers and firmware updates
I constantly read statements about the firmware which, to my knowledge, are wrong. This is why I wanted to clarify a few things:
- The EEPROM (non-volatile memory of the controller) has limited write cycles
- Right. BUT: the EEPROM of ATMega microcontrollers has a lifetime of 100,000 write cycles. So if you rewrite your memory daily, you can do it for 270 years until you break it. SO: don’t care about it!
- The EEPROM does not save settings correctly
- Entirely wrong. Once written, the settings are stored and can’t get corrupted. 99.99% of users that tell me the controller does not save their settings did not press the SAVE or WRITE button in the control software. Just changing values and clicking OK in the dialog window does not necessarily mean that the settings are written into the memory. Take care of this.
- Flashing firmware can break your controller
- Partly correct. Of course, you can break your controller by flashing wrong firmware. BUT as long as you just use standard flash tools and do not alter the fuses settings (if you don’t know what this is, you most likely won’t alter them), you can always re-flash the controller with a new firmware. If you overwrite the bootloader of the controller, you can’t flash directly via USB anymore, but the MKS-DLC boards offer an ISP connector to flash the controller manually. In my whole career, I just broke 1 controller completely (and I flashed thousands). So, the chance you do it is minimal.
- You can reset the controller by pressing the RESET button on the main board.
- Wrong. This reset button just does a reboot of the controller. Nothing is reset or set to default values.
Sculpfun iCube firmware
The update process is the same as with all 32bit boards (see respective sections), you can use either the MKS or Sculpfun upload tool. The only thing you need to be aware of is that there are two versions of the mainboard available and the firmware needs to be selected appropriately. Check the version on the mainboard and then download the correct version:
The default firmware values for the iCube are listed on the iCube-page, since the table below could not take another column. 🙂
Update process (8Bit processors, S6 and older S9)
Note
The following descriptions refer to lasers with Arduino or ATmega microcontrollers. This means the mainboards of S6 and older S9. The latest S9 models, S10 and S30 lasers have a new mainboard with an ESP32 chip, which can NOT be flashed with the following methods. (for those, see next sections)
Major steps
1. Save settings first!
2. Do firmware update
3. Check settings and restore if needed
Saving settings
Saving settings is important once you flash the firmware, since some values might be reset to factory settings while flashing. It is even recommended to reset to factory defaults after flashing and then replace changed values by your backup.
Save settings via LaserGRBL
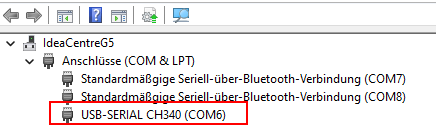
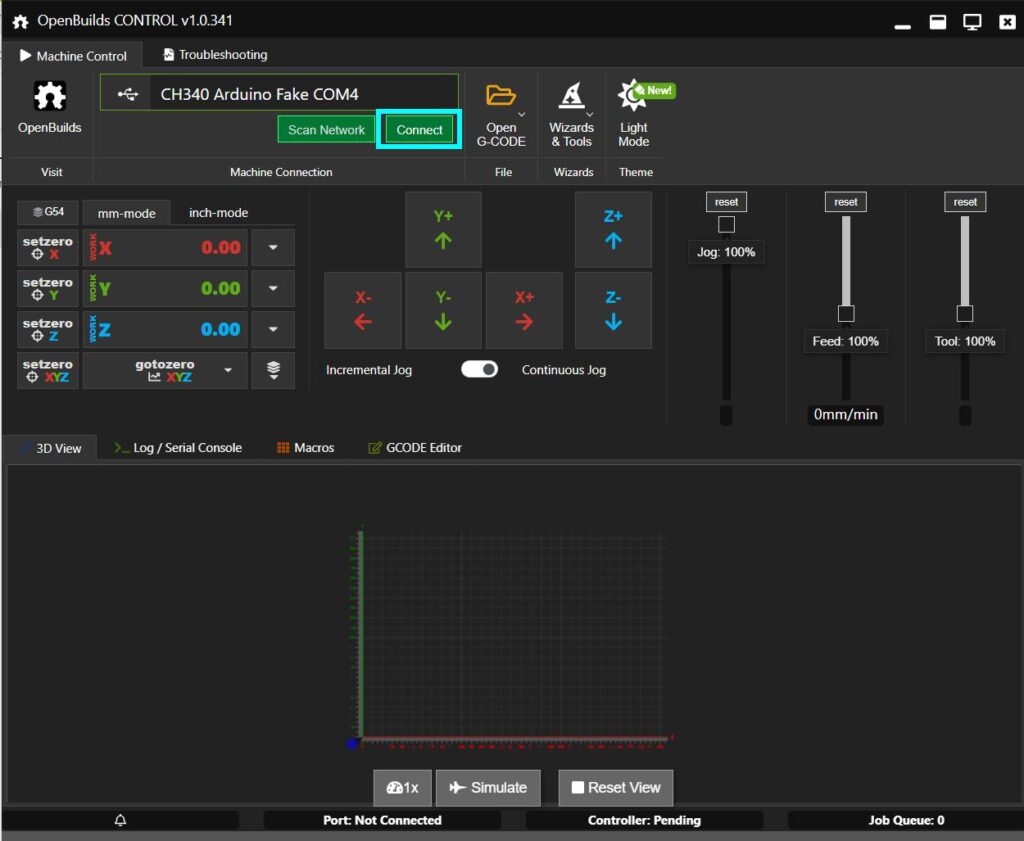
First, you need to connect to the laser by selecting the correct COM port and click on the connection icon.
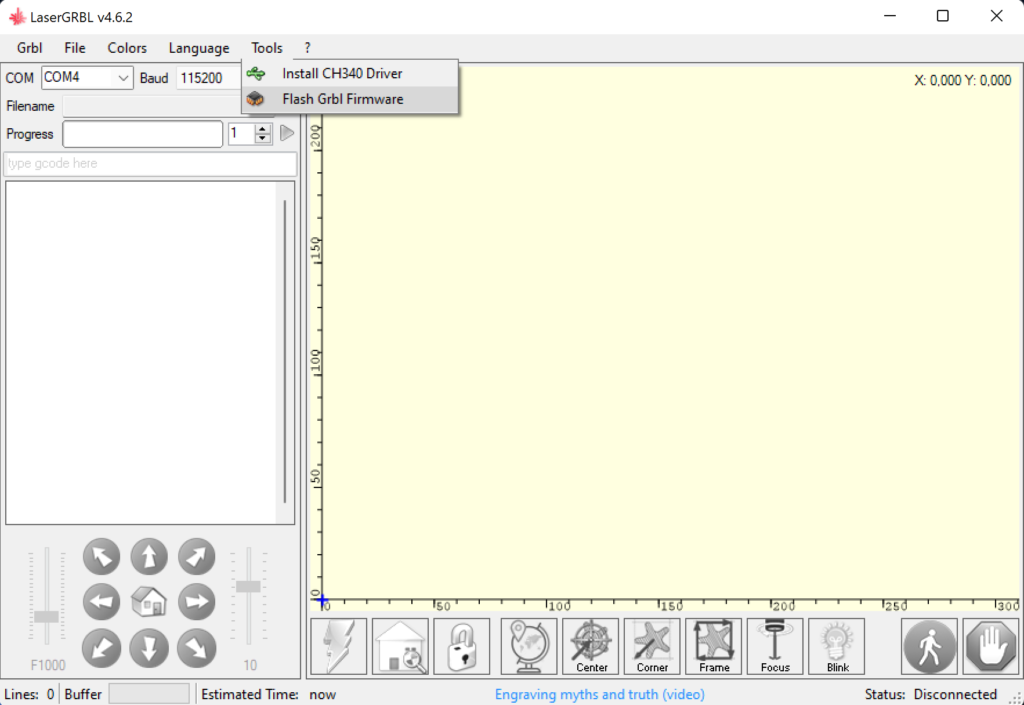
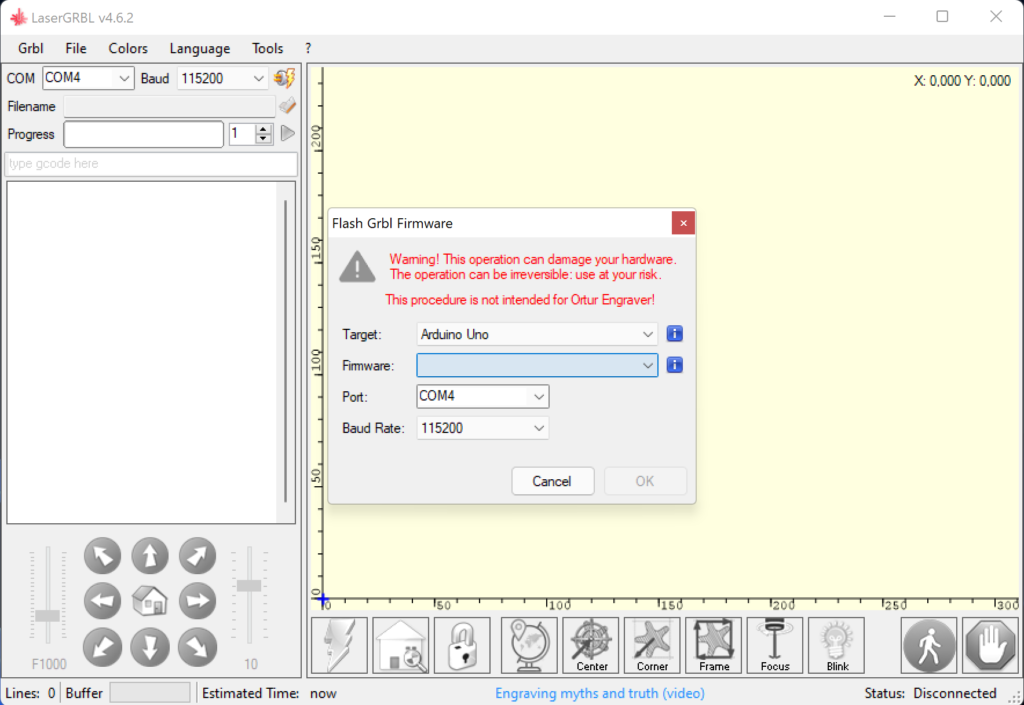
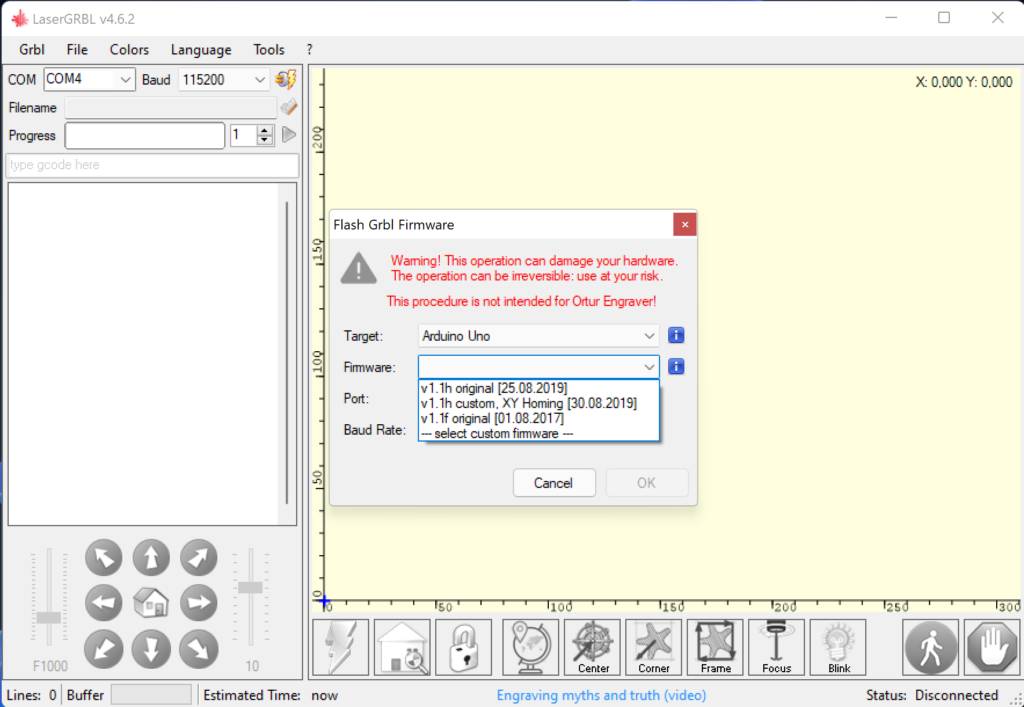
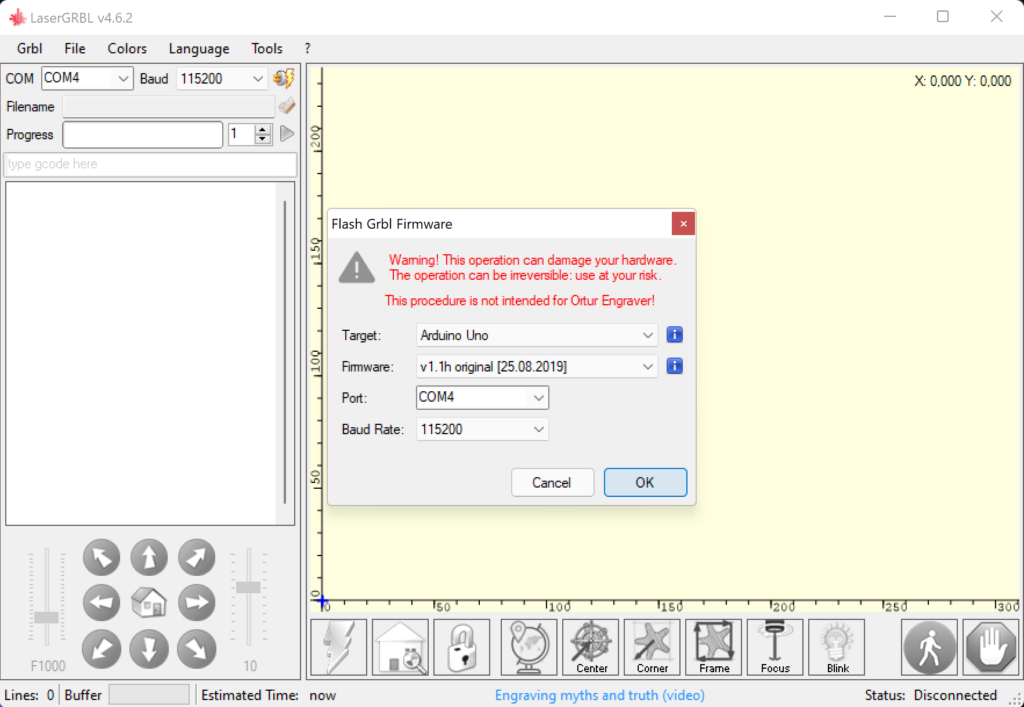
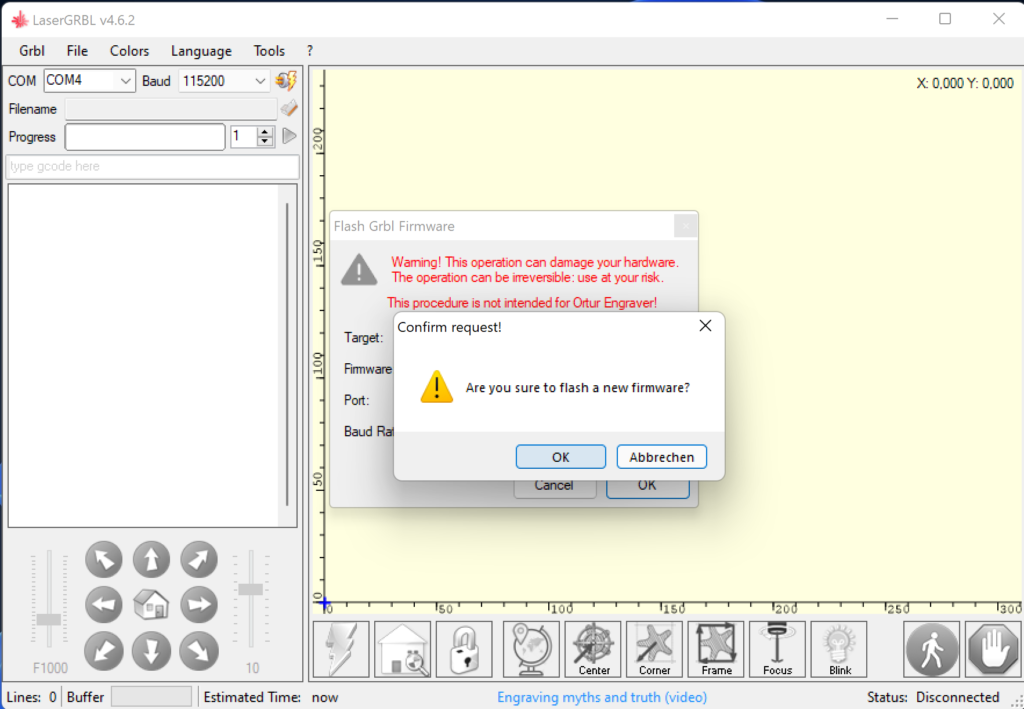
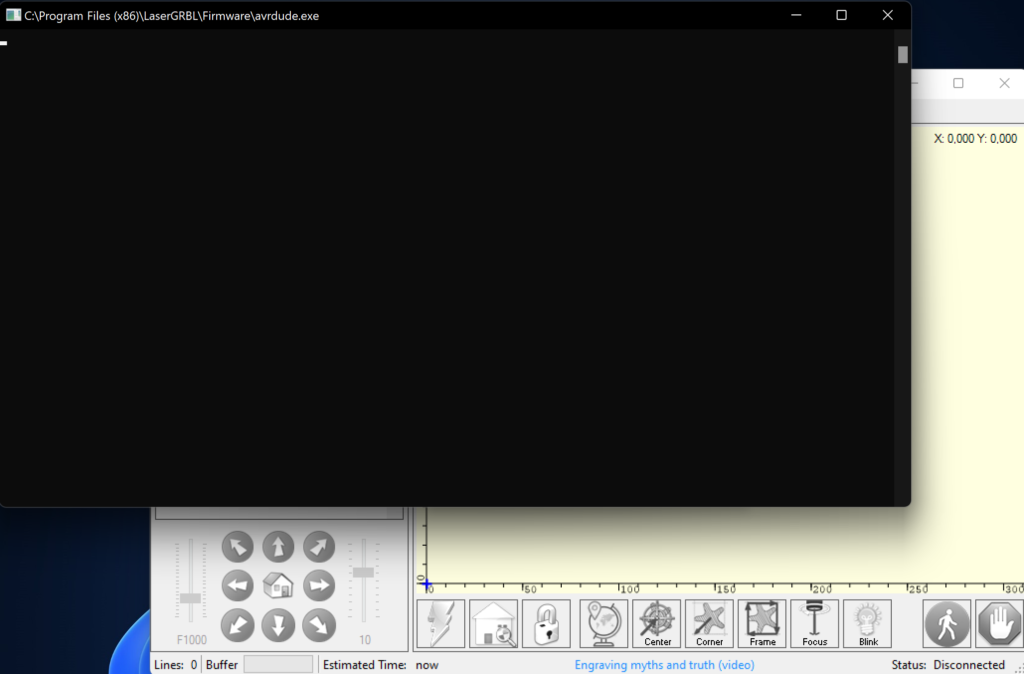
Pre-compiled firmware upload via LaserGRBL
If you just want to upgrade to the latest available grbl firmware, you can use precompiled firmware images (.hex files) that are delivered with LaserGRBL. You even have two options available, either if you have a standard setup without end stops or if you have end stops and can use automatic homing. More information at the LaserGRBL firmware flash page.
LaserGRBL
Step-per-step screenshots:
Firmware for Sculpfun lasers
Since a few default settings of grbl do not correspond to those of the Sculpfun lasers, I compiled my own version of the firmware, which is as close as possible to the firmware that can be installed via LaserGRBL, but all default settings are optimized for the Sculpfun lasers. Note: there was a minor change, the homing of individual axis has been enabled now. That’s why it’s called “v2” now.
List of changes
The following changes have been made compared to the standard firmware:
//Optimize Homing
#define HOMING_CYCLE_0 ((1<<X_AXIS)|(1<<Y_AXIS))  // Homes both X-Y in one cycle.
#define N_HOMING_LOCATE_CYCLE 2 // improve repeatability
#define HOMING_FORCE_SET_ORIGIN // set the machine origin at the homed location
#define HOMING_SINGLE_AXIS_COMMANDS // Enables single axis homing commands. $HX, $HY, and $HZ for X, Y, and Z-axis homing.
//Enable second pin for relay control
#define ENABLE_M7 // Enables a second coolant control pin

//Firmware default values
  #define DEFAULT_X_STEPS_PER_MM 80.0
  #define DEFAULT_Y_STEPS_PER_MM 80.0
  #define DEFAULT_Z_STEPS_PER_MM 80.0
  #define DEFAULT_X_MAX_RATE 6000.0 // mm/min
  #define DEFAULT_Y_MAX_RATE 6000.0 // mm/min
  #define DEFAULT_Z_MAX_RATE 6000.0 // mm/min
  #define DEFAULT_X_ACCELERATION (500.0*60*60) // 10*60*60 mm/min^2 = 10 mm/sec^2
  #define DEFAULT_Y_ACCELERATION (500.0*60*60) // 10*60*60 mm/min^2 = 10 mm/sec^2
  #define DEFAULT_Z_ACCELERATION (500.0*60*60) // 10*60*60 mm/min^2 = 10 mm/sec^2
  #define DEFAULT_X_MAX_TRAVEL 410.0 // mm NOTE: Must be a positive value.
  #define DEFAULT_Y_MAX_TRAVEL 400.0 // mm NOTE: Must be a positive value.
  #define DEFAULT_Z_MAX_TRAVEL 800.0 // mm NOTE: Must be a positive value.
  #define DEFAULT_SPINDLE_RPM_MAX 1000.0 // rpm
  #define DEFAULT_SPINDLE_RPM_MIN 0.0 // rpm
  #define DEFAULT_STEP_PULSE_MICROSECONDS 10
  #define DEFAULT_STEPPING_INVERT_MASK 0
  #define DEFAULT_DIRECTION_INVERT_MASK 0
  #define DEFAULT_STEPPER_IDLE_LOCK_TIME 25
  #define DEFAULT_STATUS_REPORT_MASK 1 // MPos enabled
  #define DEFAULT_JUNCTION_DEVIATION 0.01 // mm
  #define DEFAULT_ARC_TOLERANCE 0.002 // mm
  #define DEFAULT_REPORT_INCHES 0 // false
  #define DEFAULT_INVERT_ST_ENABLE 0 // false
  #define DEFAULT_INVERT_LIMIT_PINS 0 // false
  #define DEFAULT_SOFT_LIMIT_ENABLE 0 // false
  #define DEFAULT_HARD_LIMIT_ENABLE 0  // false
  #define DEFAULT_INVERT_PROBE_PIN 0 // false
  #define DEFAULT_LASER_MODE 1 // false
  #define DEFAULT_HOMING_ENABLE 0  // false
  #define DEFAULT_HOMING_DIR_MASK 0 // move positive dir
  #define DEFAULT_HOMING_FEED_RATE 150.0 // mm/min
  #define DEFAULT_HOMING_SEEK_RATE 1000.0 // mm/min
  #define DEFAULT_HOMING_DEBOUNCE_DELAY 250 // msec (0-65k)
  #define DEFAULT_HOMING_PULLOFF 1.0 // mm
Download: v1.1h-custom-S6S9v2.hex
The file can be installed in several ways. I would consider the following two to be the easiest.
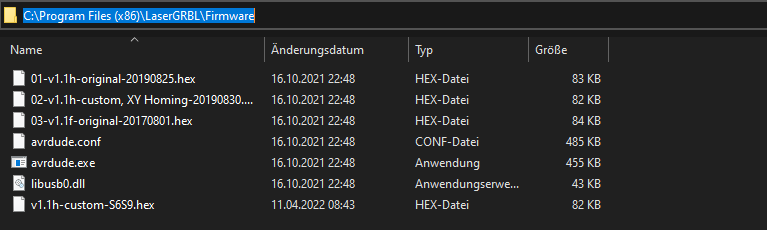
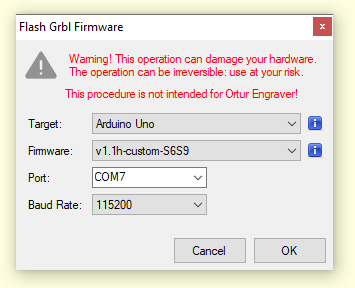
Installation via LaserGRBL
To enable LaserGRBL to offer the firmware in its dialog window, it must be moved into the firmware directory within LaserGRBL.
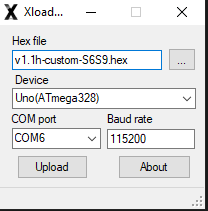
Installation via Xloader
There is a small tool, XLoader, which can be used to upload the hex files without any other tools. I have prepared an archive here that already contains the correct firmware: Download XLoader. With this, you can upload the firmware directly. The firmware file and the COM port must still be selected accordingly.
Regardless of which method was selected, the firmware should then report with the version string “grbl 1.1h_S6S9universal”. Now all settings should be reset to the factory defaults, this is done with the command “$RST=*”. Thereafter, the parameters can be adjusted to the personal preferences again or restored from the backup.
If you have now misconfigured your parameters, you can always return to the Sculpfun defaults with the command “$RST=*” and have a running machine again.
Self-compiled firmware using Arduino IDE
Since I am used to compiling my own firmware via Arduino IDE, PlatformIO or just command line, I normally use this process. The process to prepare the firmware and upload it to the controller is described very well at the grbl homepage: Compiling grbl
After the files are installed as Arduino-library, there are three files that are interesting: config.h, defaults.h and cpu_map.h. cpu_map.h is just for information, which Arduino pins are mapped to which functions. Of course, you can adapt those to your needs. Defaults.h contains the default settings that are loaded if you reset the controller to firmware defaults. I use this to define my personal defaults and don’t have to care about saving them each time I change the firmware.
The most interesting file is config.h. Here you can set every setting you might need. This includes adding additional functionality, inverting logic pins, or adjusting parameters. After changing the parameters as you like, you do an upload using the Arduino IDE.
LightBurn recently released a video guide on how to install the self-compiled firmware on a Sculpfun laser:
Rebooting the controller
As stated before, a reboot can be issued by pressing the reset button on the main board (if there is one). Obviously, you can also reboot the controller by power cycling it. BE AWARE: nearly all main boards of diode lasers (and 3D printers as well) have an electrical connection between the USB connection and the microcontroller. If you just turn off the main power switch and leave the USB connection active (PC is turned on and providing power through USB)—the microcontroller IS NOT TURNED OFF! It is still running and using power from USB. So, it does no reboot cycle. [You can check this out by only connecting the USB cable and then use LightBurn or LaserGRBL to connect to your laser. This will work. You can also alter settings and save them. You can check the state of limit switches and all periphery. Only the motors and laser do not work because they need extra power.] So if you really want to reboot your controller, you need to turn off main power and also cut the USB connection. Then you have a clean reboot.
If you want to avoid this, you can also disconnect the supply voltage (VCC, the 5V line, usually red cable) from the USB cable. Then data can still be transferred, but without the main power supply, the microcontroller will also turn off.
[Update April 2022] There appears to be a new version of the motherboard, XY DLC V1.1. Here, it appears to me that this has already been changed, and the microcontroller is switched off completely when the main switch is pressed. Cool!
Firmware update ESP32 (new S9, S10-S30)
Note
The official firmware image for the S10 is available here: Download-Link (be aware that the file naming is a little strange). There is now a new testing version that also enables the Bluetooth functionality! Download it here.
The firmware for the S30 series has also been released! You can download it here: Download-Link (after flashing, all settings are reset to default, so make sure to back up before – the default settings do not apply to every laser). Since the S9s produced after ~ 2021 (I don’t know the exact date) also ship with the S30 mainboard, this firmware is also used for the S9 models with 32bit mainboards.
The firmware for the S30 Ultra series can be downloaded here.
The new S9, S10 and S30 lasers do not have an ATmega microcontroller on the mainboard like the other lasers, but an ESP32 chip. This is not relevant for most users, but the ESP represents a different (newer) generation of chip. Among other things, it supports Wi-Fi, but this is not currently enabled. I assume that this functionality will be integrated at some time. The chip is much more powerful than the old generation and can therefore work at higher speeds. But since almost all firmwares for the ESP32 chips currently only use a port of the old grbl code, the improvements are still very limited.
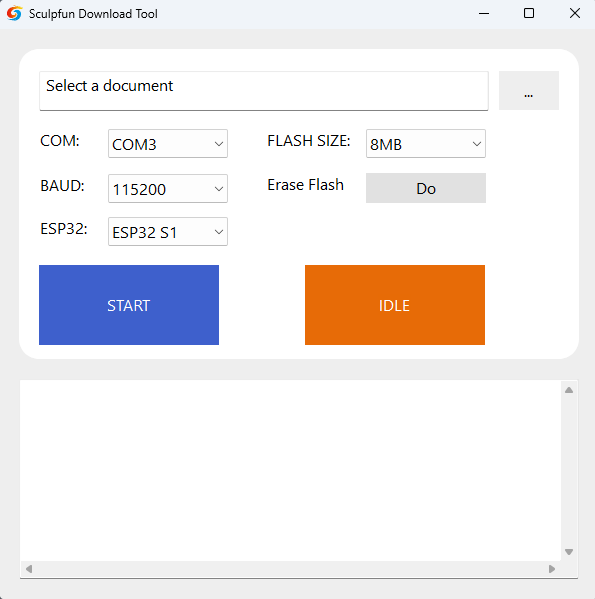
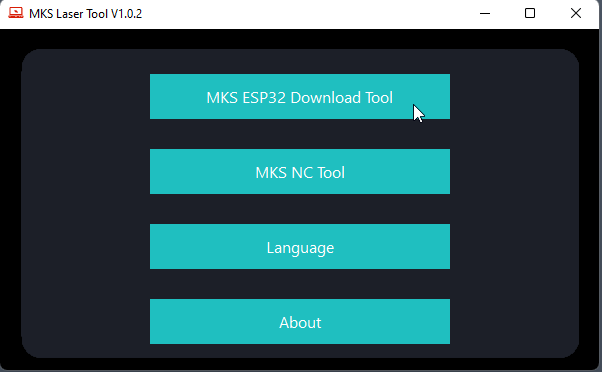
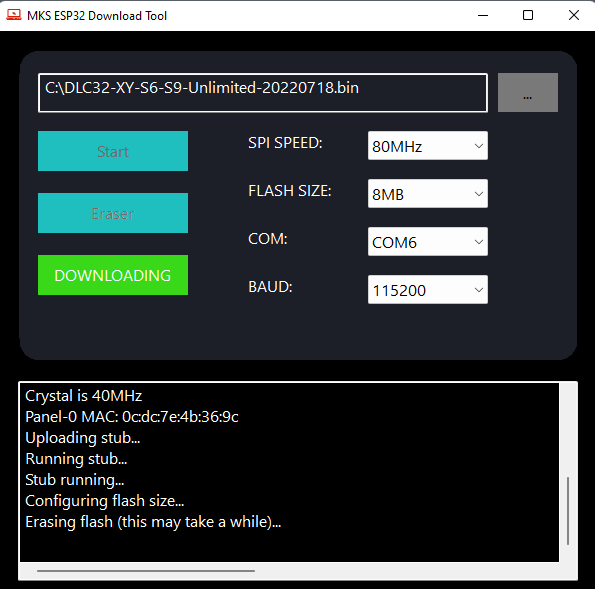
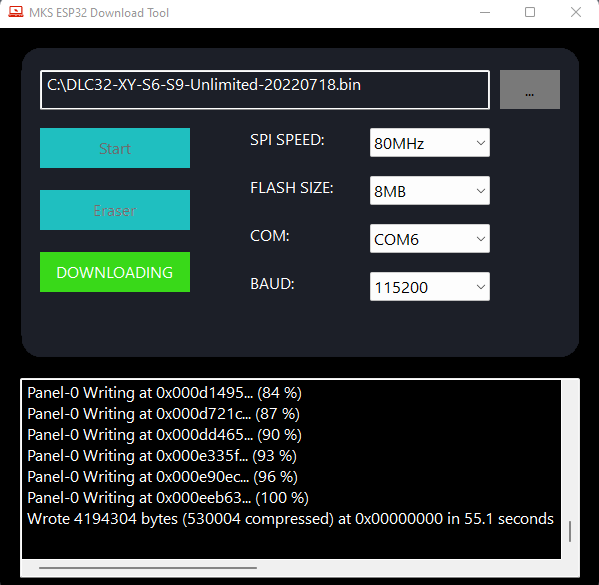
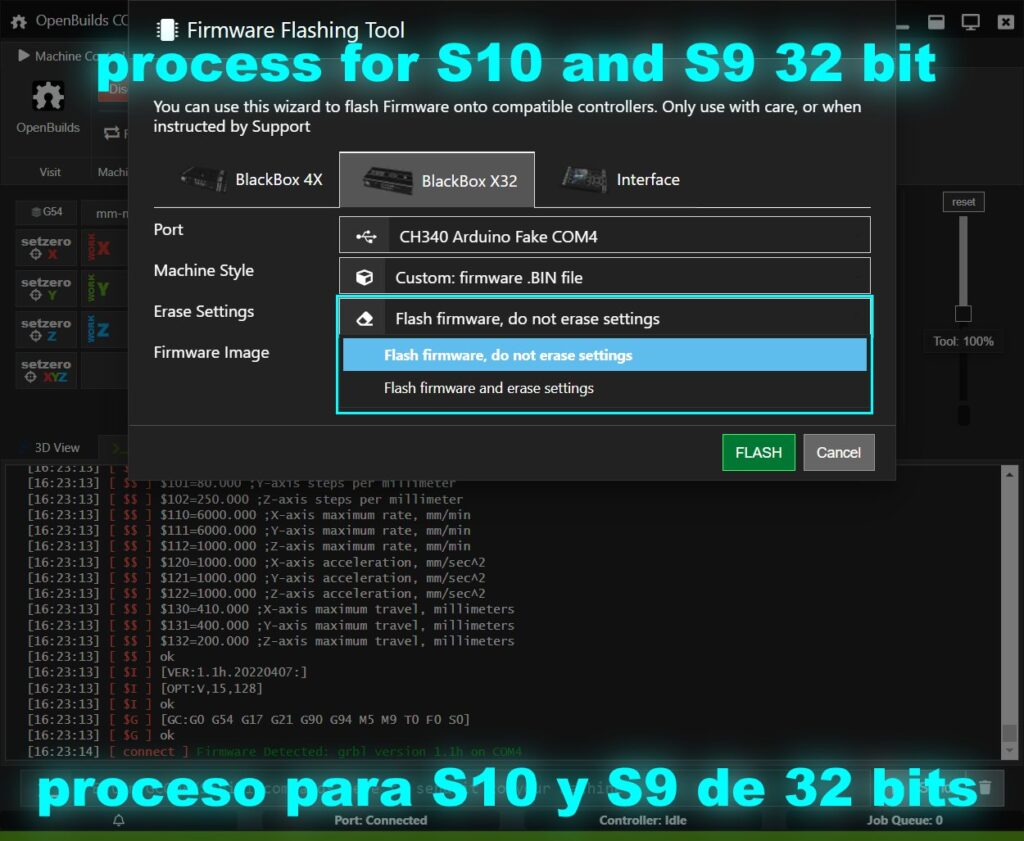
For the update, a separate tool is needed that I have seen so far only for Windows systems. Here is the download link. Those with a Mac will have to resort to virtualization like Parallels or a Windows machine (edit: it seems there is a Mac version available as well). In the following series of pictures, the upload is explained. Be sure to back up your firmware settings if you changed any values! Using Linux, the chip can be flashed using the command line:
python3 esptool.py --baud 300000 --chip esp32 --port /dev/ttyUSB write_flash --flash_mode dio --flash_size detect 0x0 firmware-filename.binUpdate: Sculpfun recently released their upload tool, which can be downloaded on the downloads page (e.g. the iCube software tools page)

Note:
- It is best to connect ONLY the USB cable, DO NOT connect the power supply or leave the small switch in the OFF position. The controller is powered via the USB cable and may not reset properly if external power is on. Note: Depending on the board, this varies. For the S30, the power supply must be ON.
- After flashing, all settings are reset to factory defaults. Therefore, also in this case, make a backup of the settings before! (E.g., with LaserGRBL, as described above, this also works for the S10).
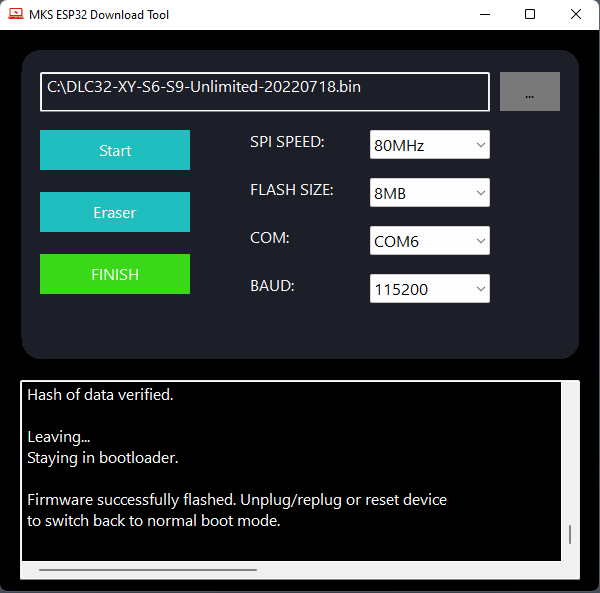
- After the successful flashing, unplug the USB cable once and plug it in again so that the controller restarts (therefore do not connect another power cable, then it will not restart).
Now the laser should connect again as usual.
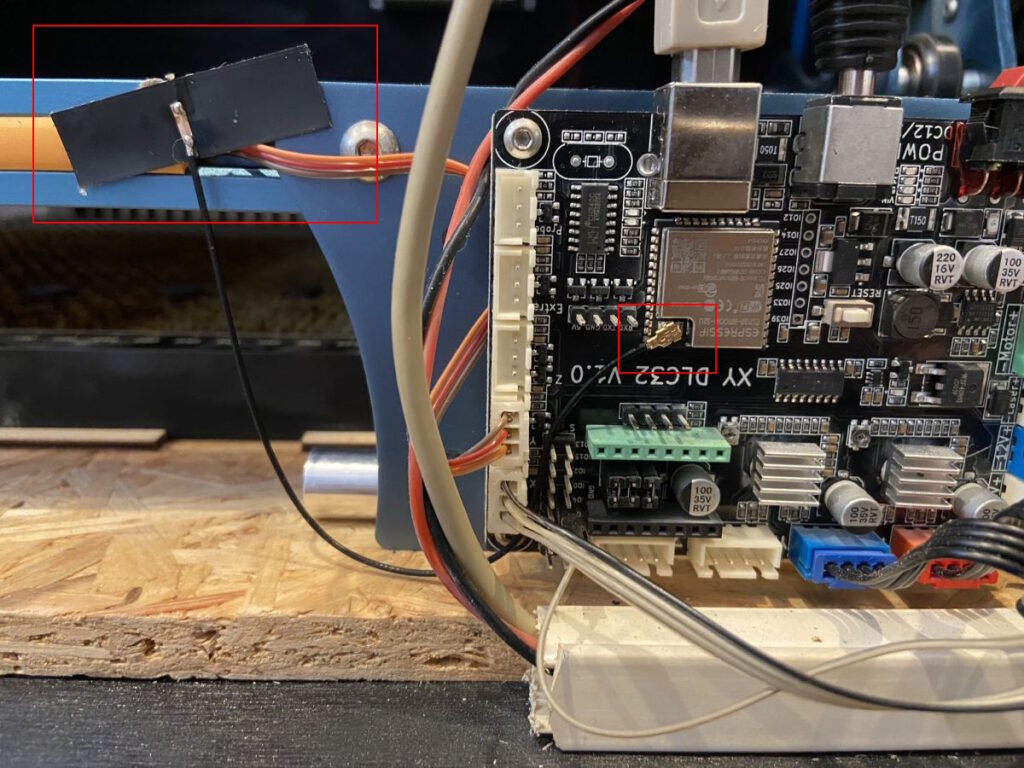
If you want to use the Bluetooth functionality, you need to add an antenna to the mainboard (see below). The type of the antenna is IPEX 1 WIFI/BT 4DB.
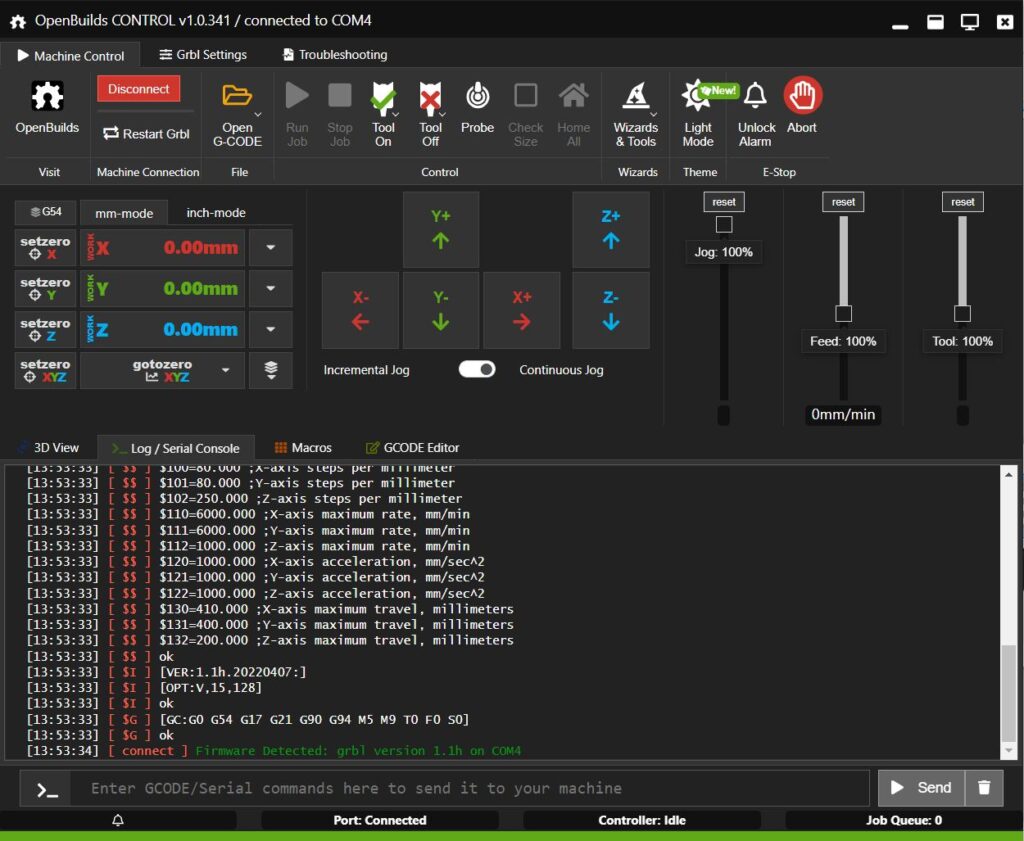
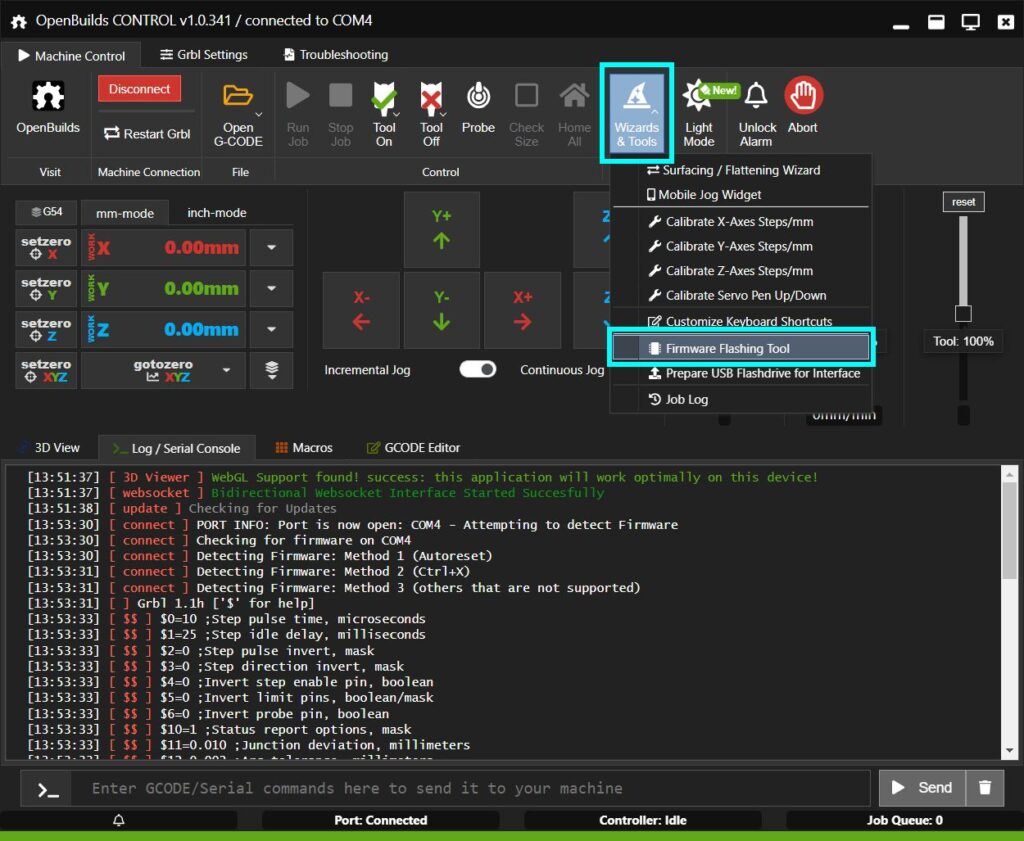
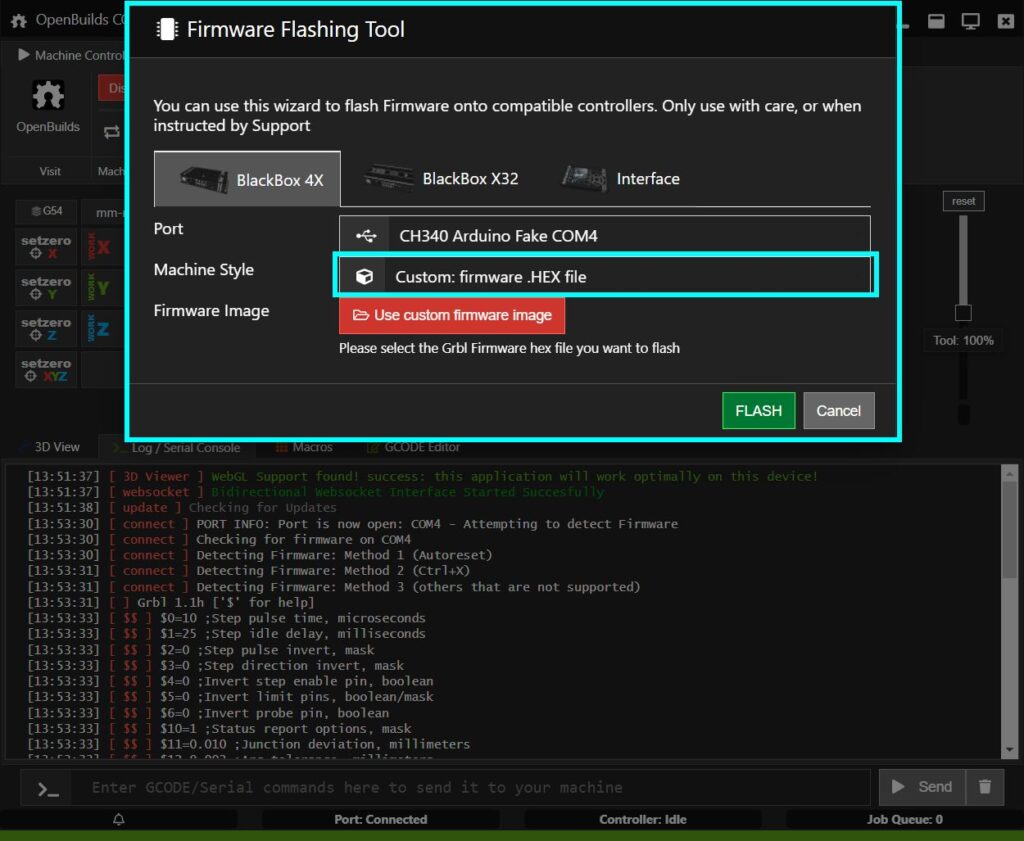
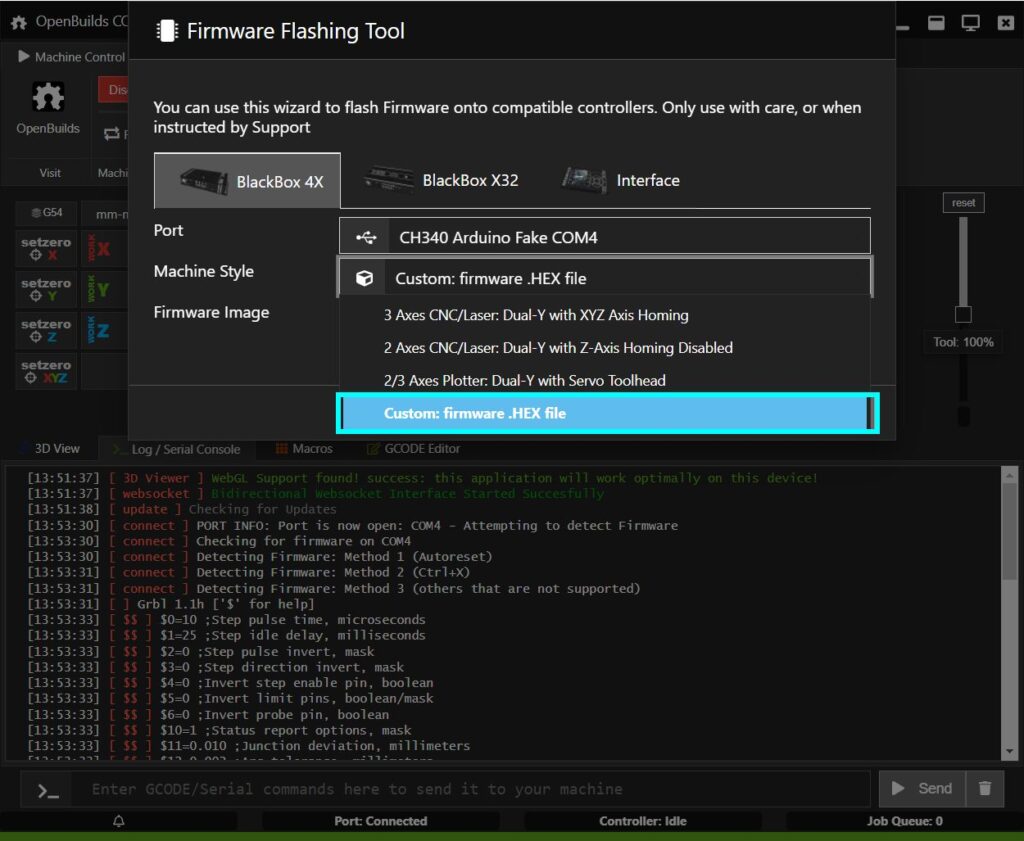
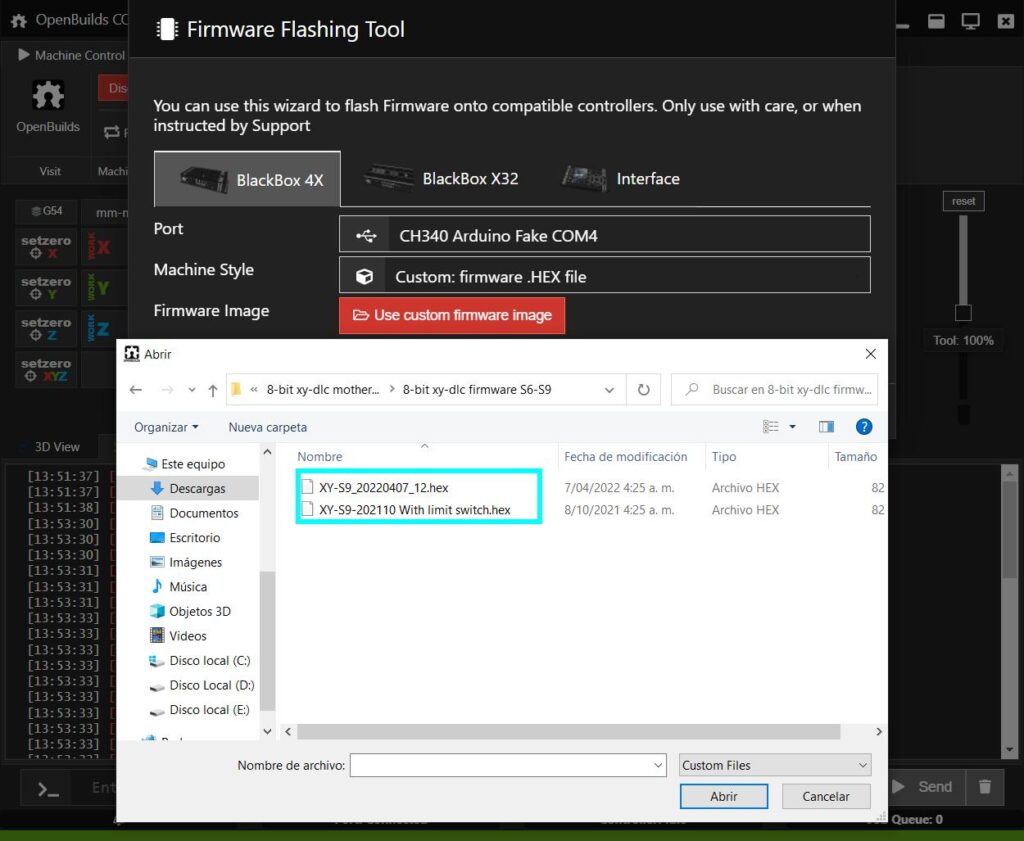
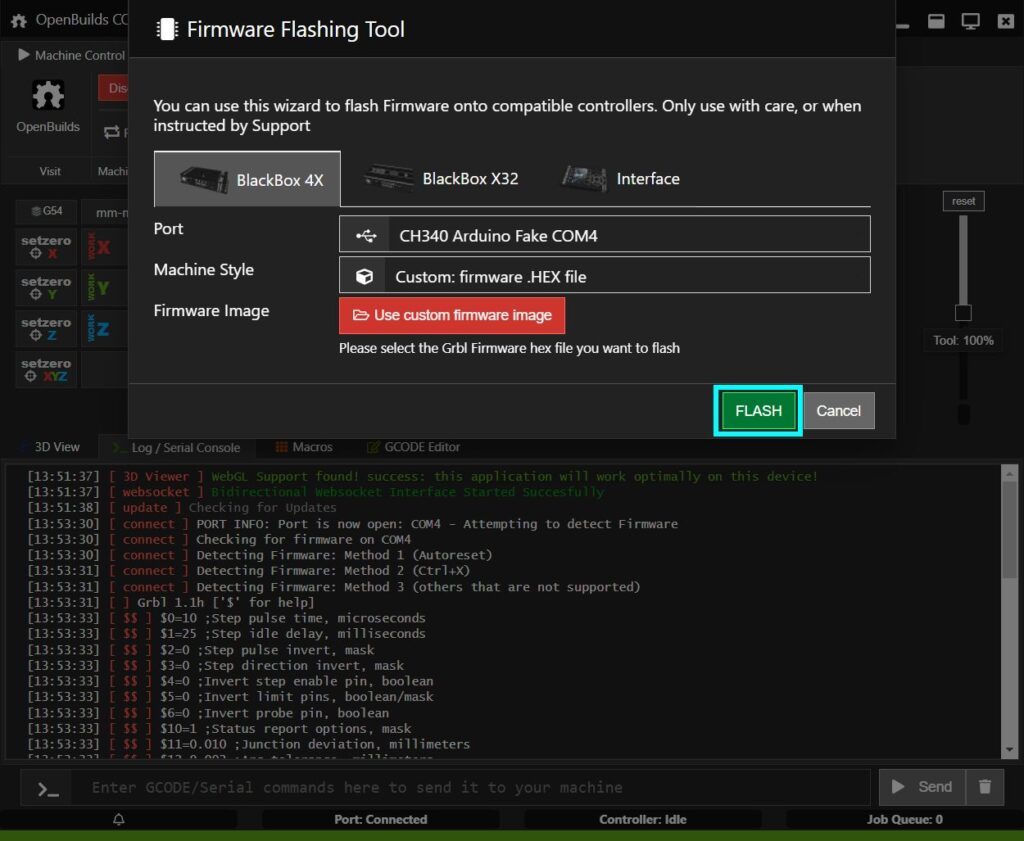
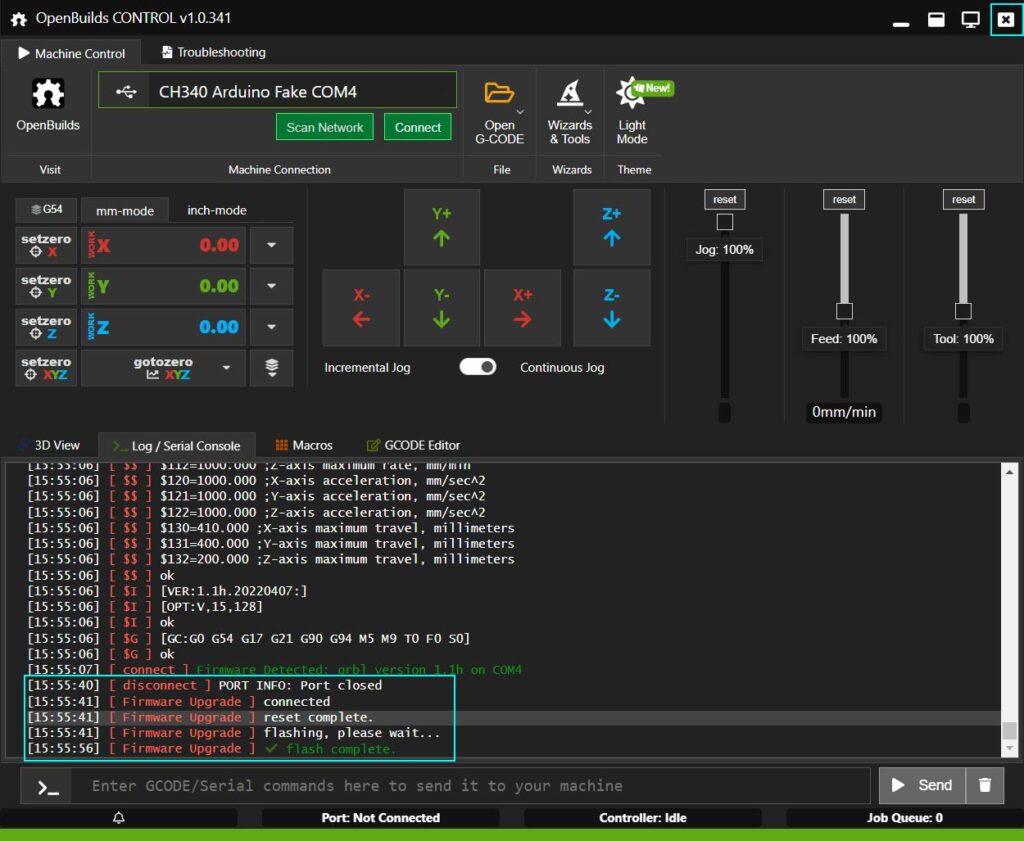
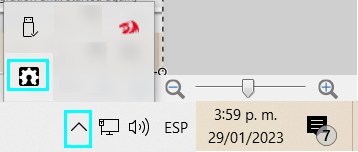
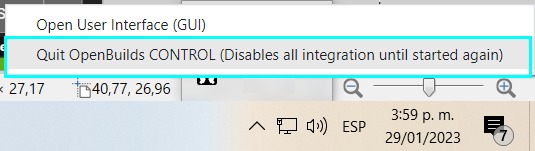
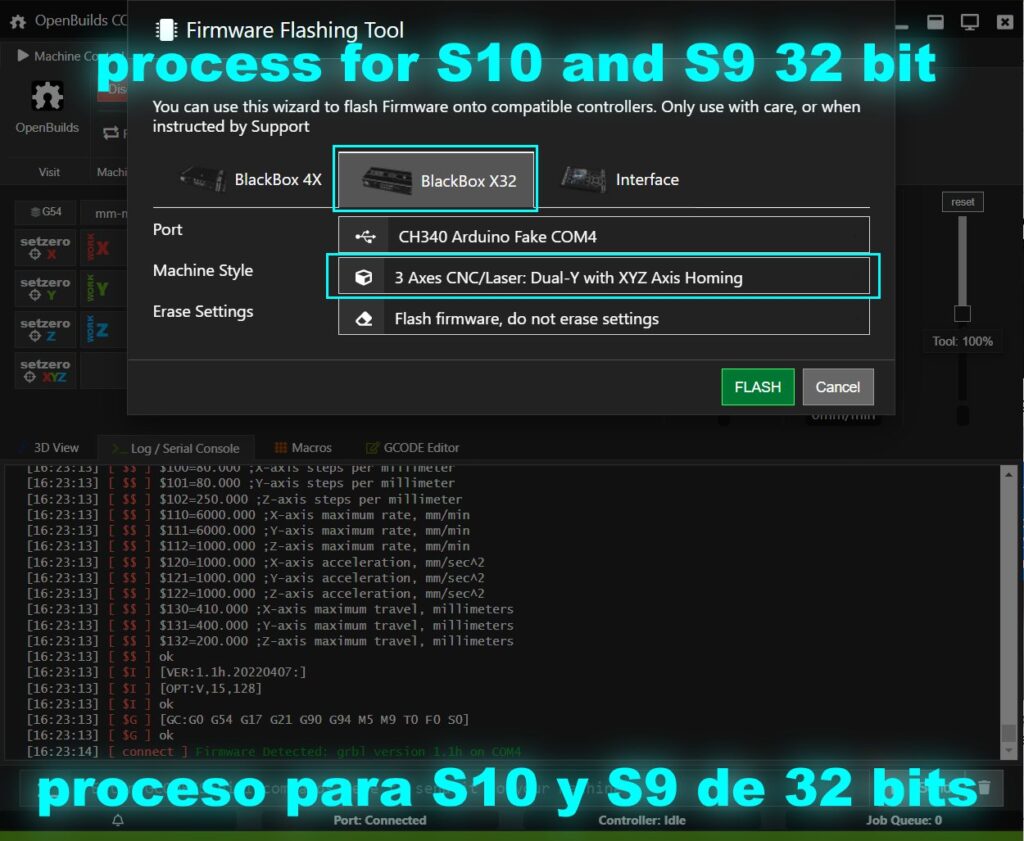
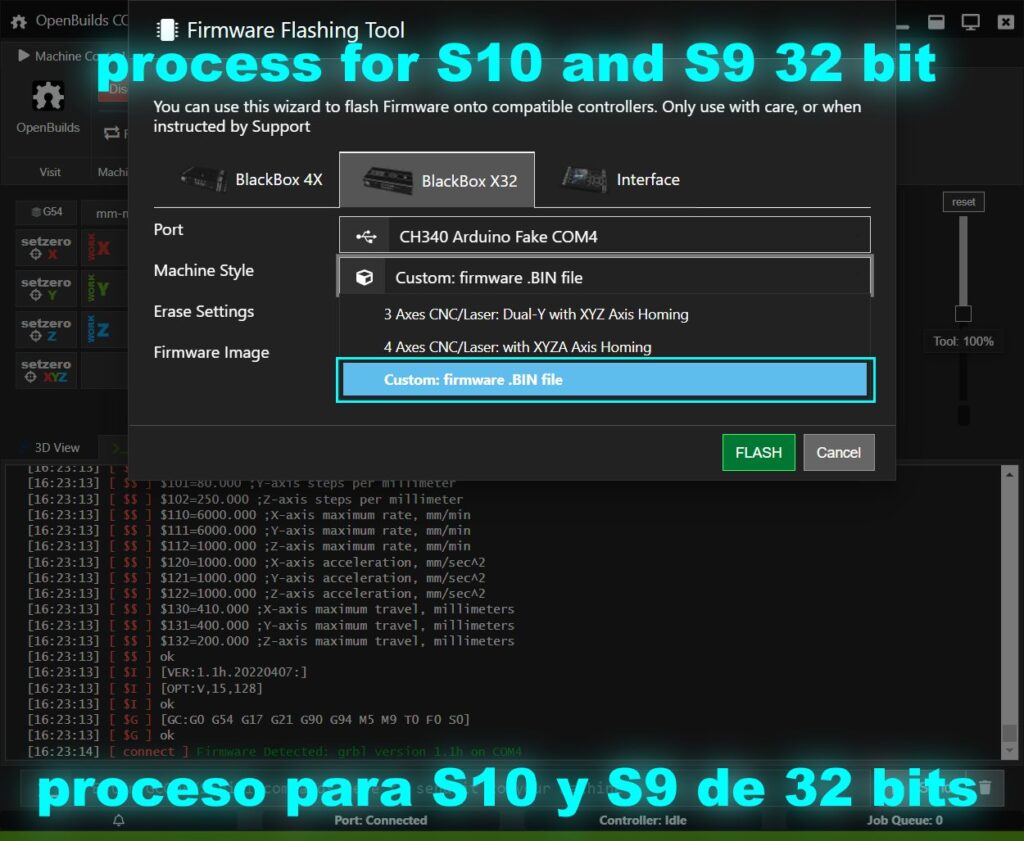
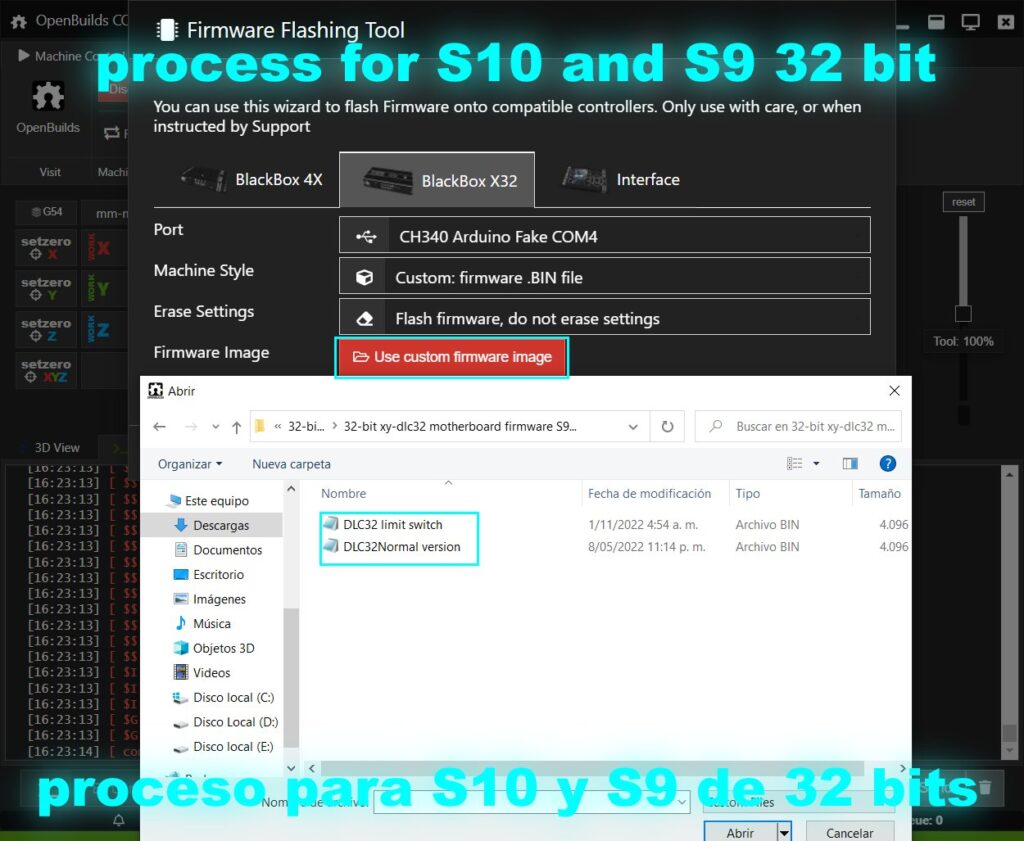
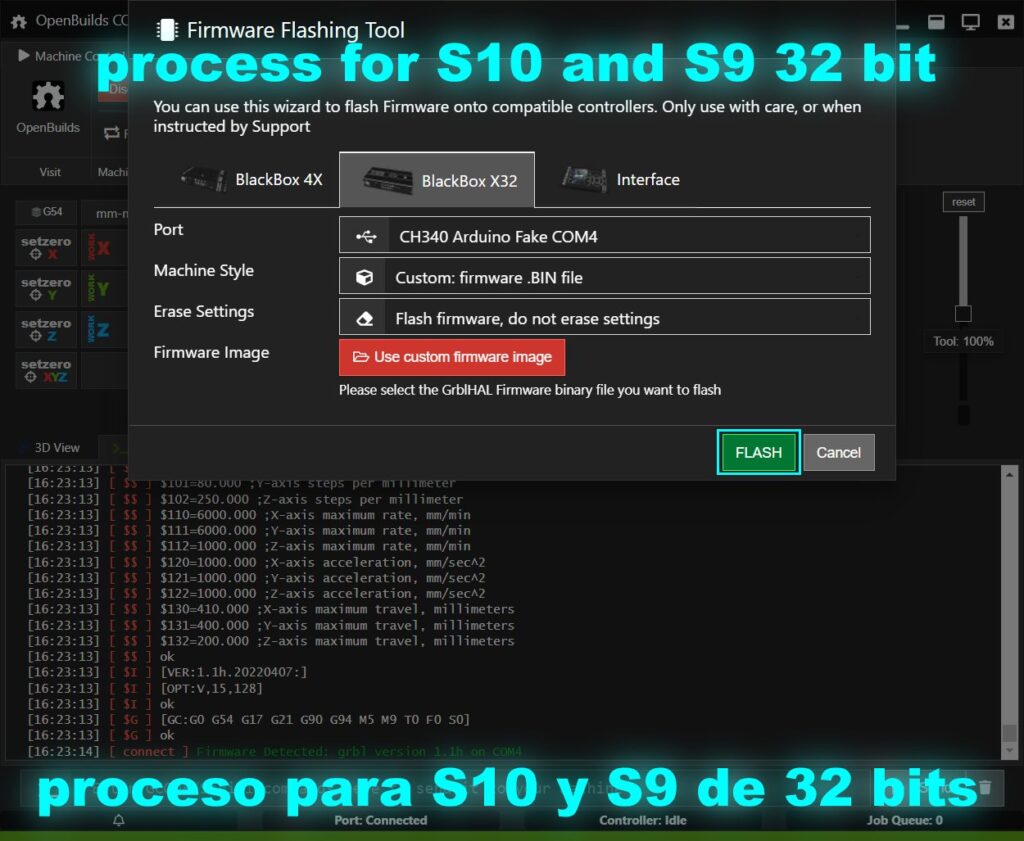
Alternative using OpenBuilds software (8bit + 32 bit)
Manolo from the official Facebook group published a walkthrough if you want to use the OpenBuilds software to flash the boards. The firmware files can be downloaded above.
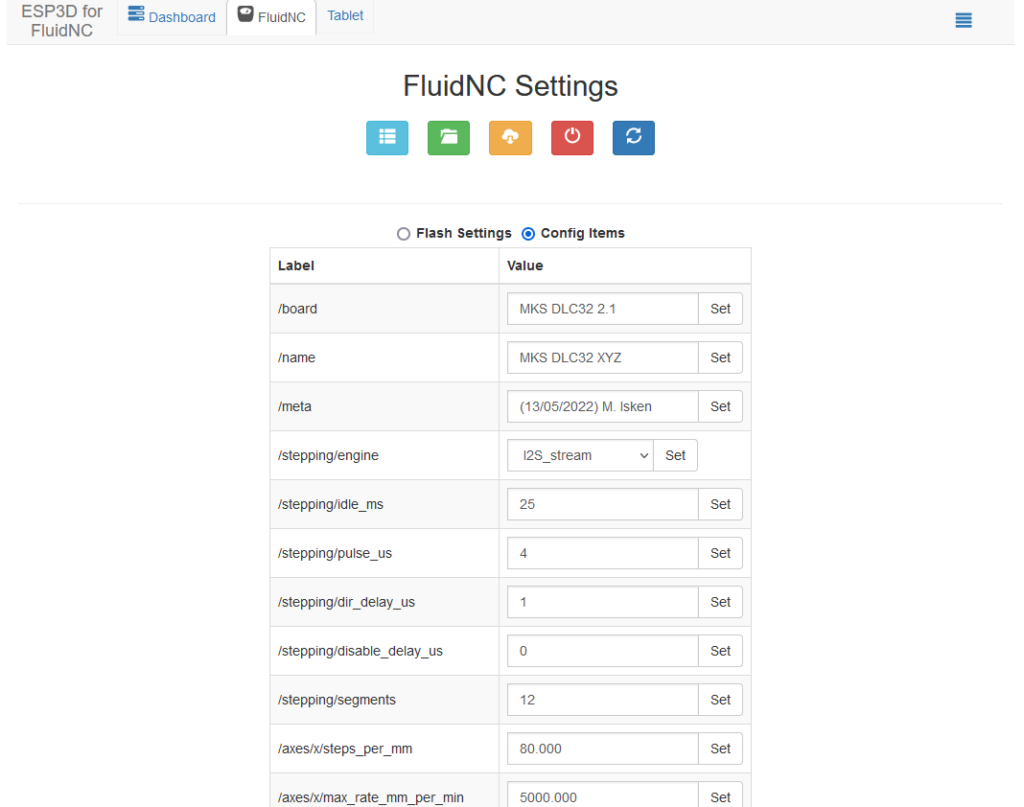
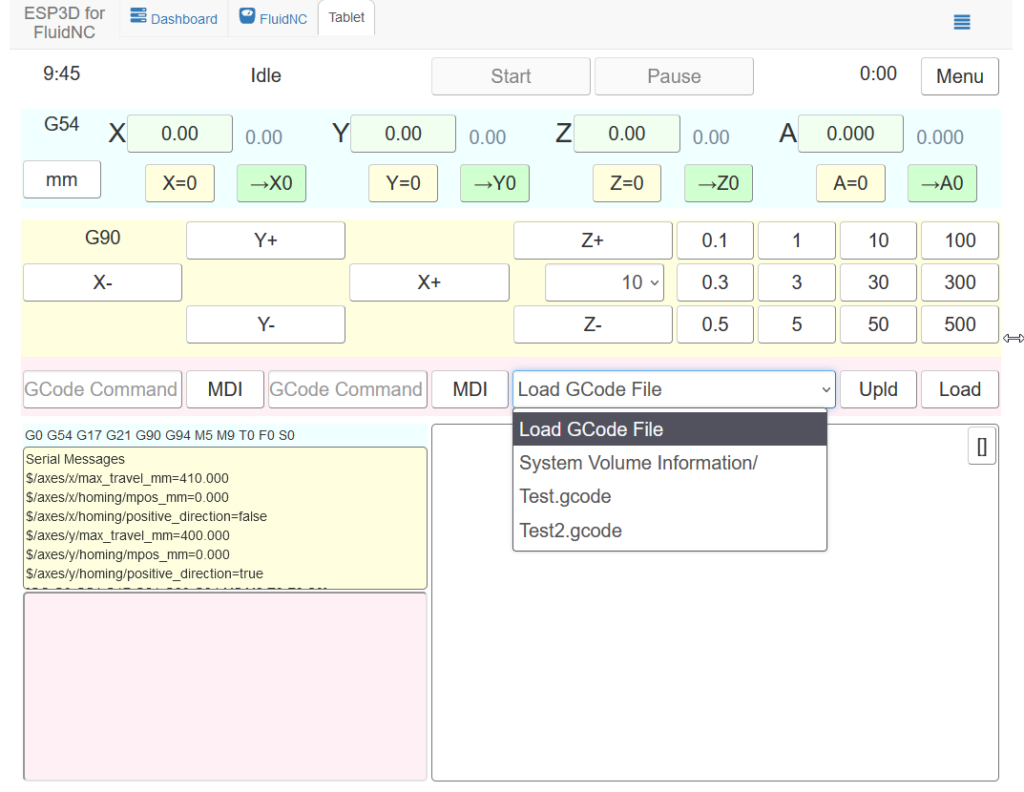
FluidNC
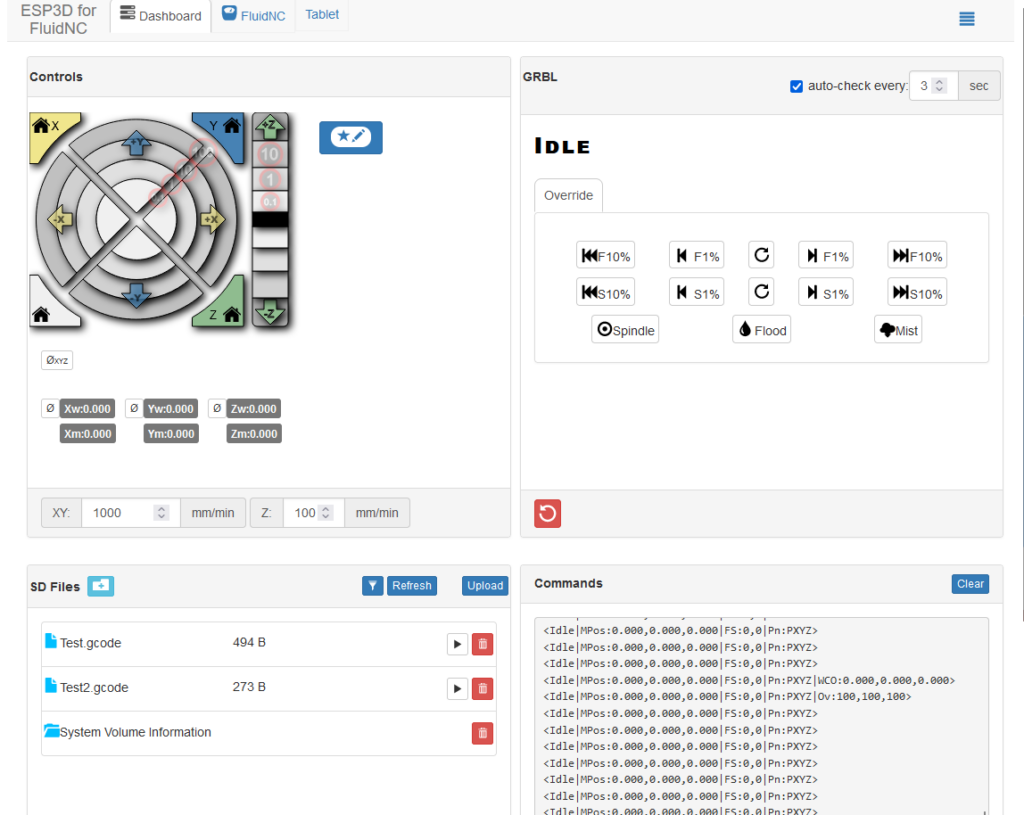
The FluidNC firmware can be downloaded here: https://github.com/bdring/FluidNC. For the S9 using the MKS DLC32 board, I also created a working configuration: FluidNC_SculpfunS9. This should also work with the S10, but I have not yet tested. Those configurations only work on the MKS DLC32 mainboard connected to the lasers. The S10 mainboard should work as well. And here is a version of the FluidNC config file for the S30 mainboard: config.yaml-Download. The installation works with a script that is included in the installation archive. You do not need the MKS tool, as with the above variants. There is probably work on display support, currently there is none. The control takes place via the web interface (or LaserGRBL/LightBurn, etc.).
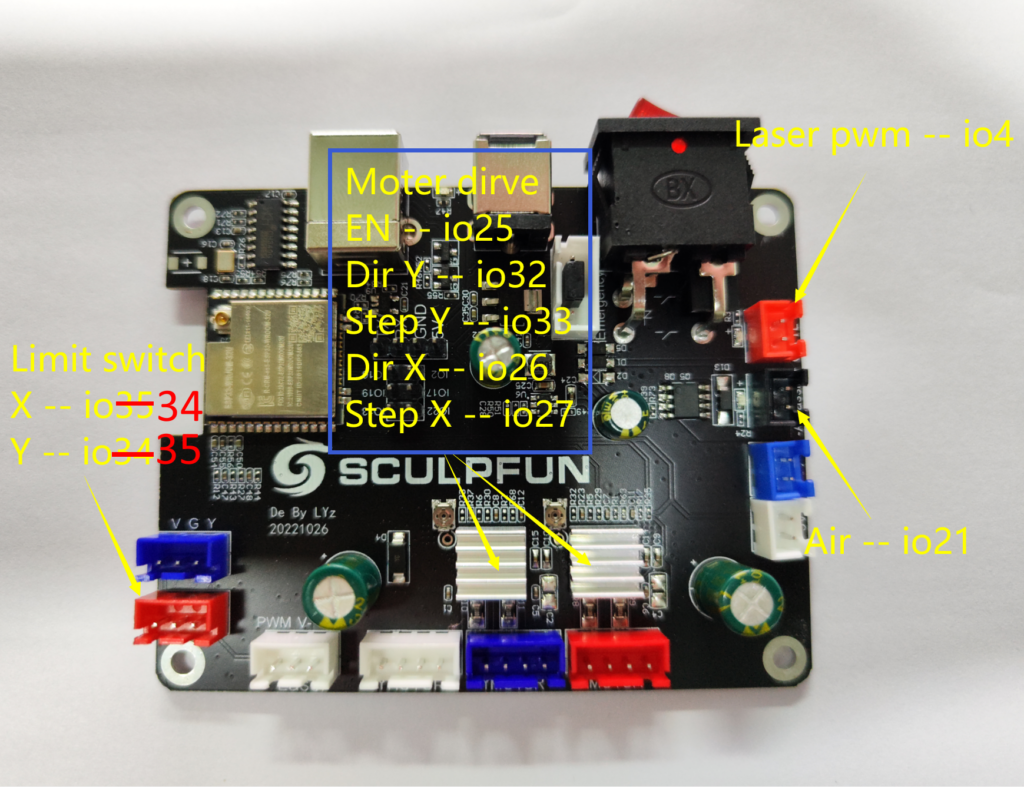
You can find additional notes and information about FluidNC on a Sculpfun here: mainboard replacement and relay control.
Recommended Firmware Settings (all models)
If you want to change a setting, you can do this via the console by entering the parameter, followed by an equal sign and the corresponding value, and then pressing Enter. The controller should answer with OK.
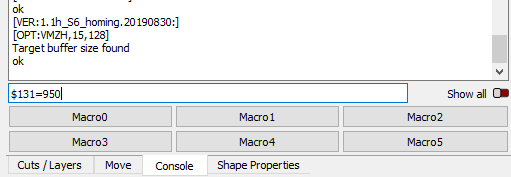
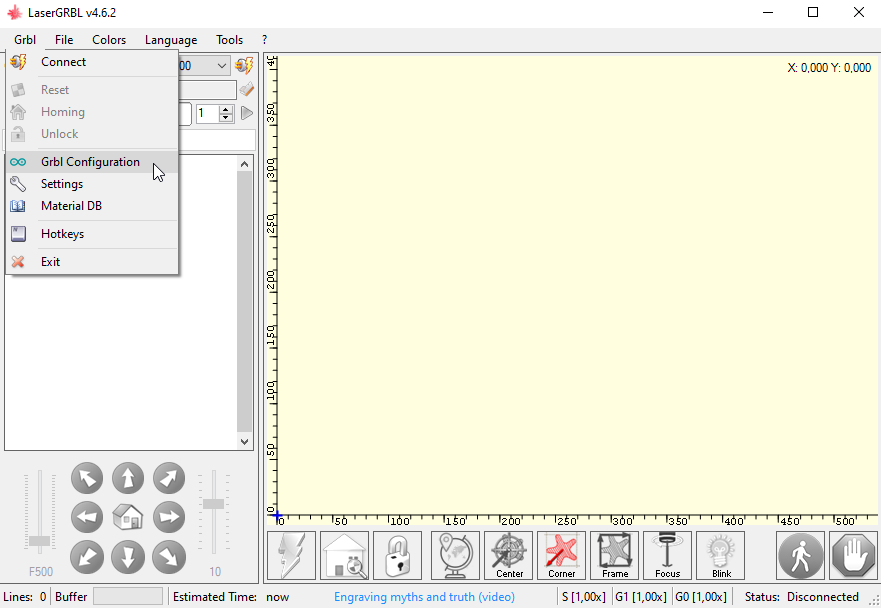
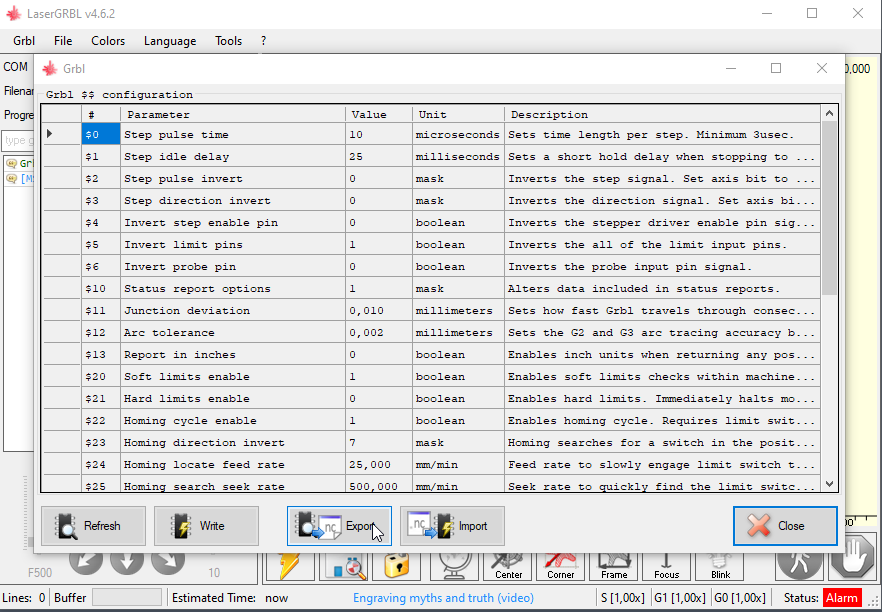
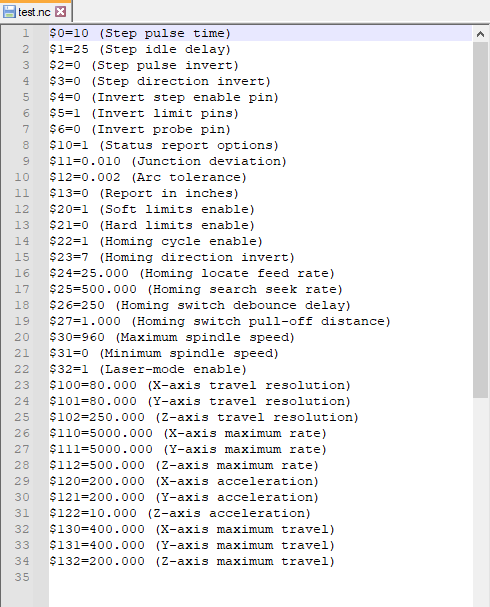
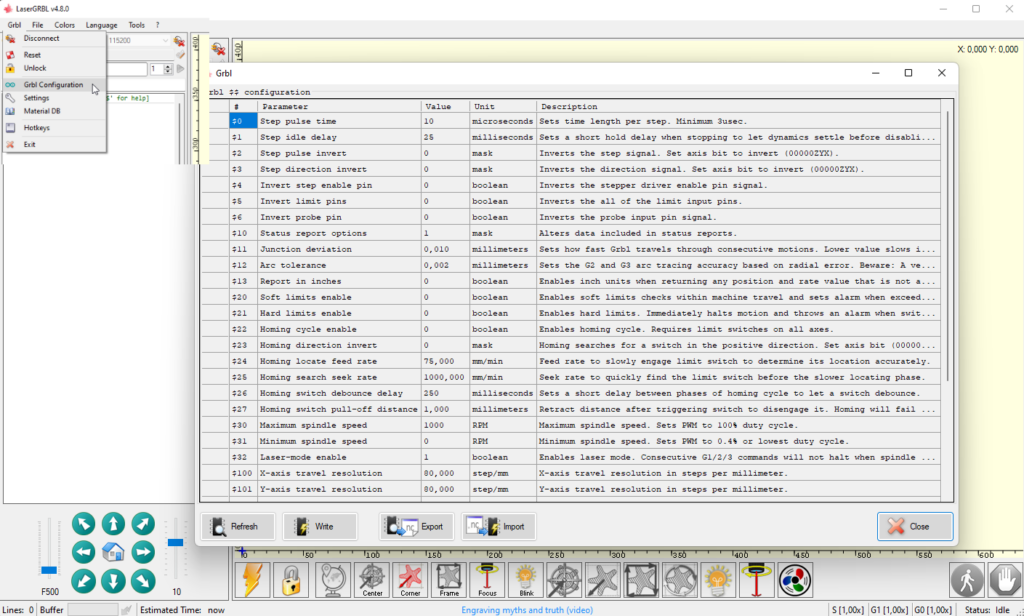
You can display all current parameters by typing “$$” and pressing enter. LightBurn and LaserGRBL also have graphical dialogs to change these settings (“Machine Settings” in LightBurn and “grbl Configuration” in LaserGRBL).
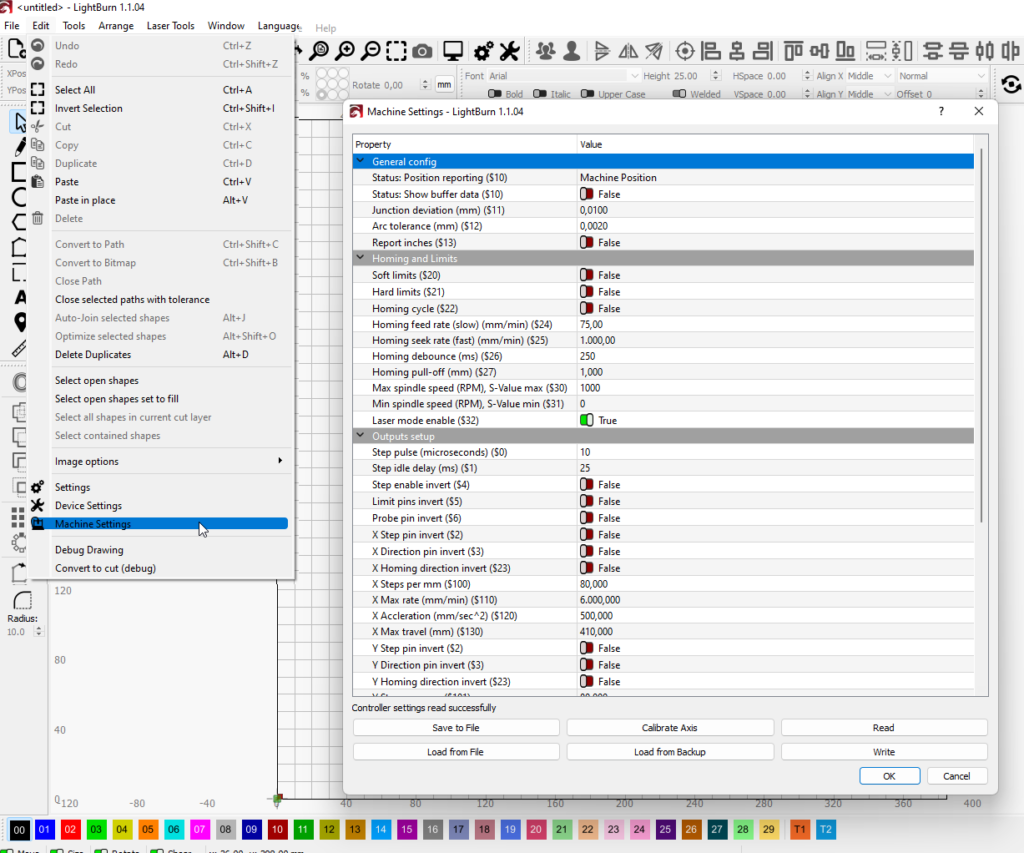
The following table lists my recommended settings for the S6/S9 lasers. The “standard”-column lists the values that are set standard in the grbl firmware. The “S6/S9”-column shows the recommended / required settings for S6/S9. The third column lists changes that are required if you activate homing functionality. If there is no value in a column, the standard value is used!
| # | Standard | Changes Sculpfun | Changes Homing | S30 (Pro Max) | S30 Ultra | Explanation | Comment |
| $0 | 10 | Step pulse, microseconds | |||||
| $1 | 25 | Step idle delay, milliseconds | |||||
| $2 | 0 | Step port invert, mask | |||||
| $3 | 0 | 4 | 4 | Direction port invert, mask | Here the motors of the axes can be turned around if necessary (e.g. if you have to turn the whole frame) | ||
| $4 | 0 | Step enable invert, boolean | |||||
| $5 | 0 | 0/1 | 1 | 1 | Limit pins invert, boolean | Depending on switches. Some limit switches have inverted behavior, this can be compensated here. | |
| $6 | 0 | Probe pin invert, boolean | |||||
| $10 | 1 | 0/1 | 1 | Status report, mask | Depending on workspace configuration, see article about limit switches. | ||
| $11 | 0.010 | Junction deviation, mm | |||||
| $12 | 0.002 | Arc tolerance, mm | |||||
| $13 | 0 | Report inches, boolean | |||||
| $20 | 0 | 1 | 1 | 0/1 | Soft limits, boolean | ||
| $21 | 0 | 0 | 1 | Hard limits, boolean | |||
| $22 | 1 | 0 | 1 | 1 | 1 | Homing cycle, boolean | |
| $23 | 0 | 0 | 0-7 | 7 | 7 | Homing dir invert, mask | Depending on position of switches; see guide for homing |
| $24 | 25 | 75 | 200 | 200 | Homing feed, mm/min | ||
| $25 | 500 | 1000 | 1500 | 3000 | Homing seek, mm/min | ||
| $26 | 250 | Homing debounce, milliseconds | |||||
| $27 | 1 | 1 | 2 | 2 | Homing pull-off, mm | Return distance into the workspace after reaching the home position | |
| $30 | 1000 | Max spindle speed, RPM | |||||
| $31 | 0 | Min spindle speed, RPM | |||||
| $32 | 0 | 1 | 1 | 1 | 1 | Laser mode, boolean | |
| $100 | 250 | 80 | 80 | 80 | 80 | X steps/mm | Can be calibrated even more precisely as required |
| $101 | 250 | 80 | 80 | 80 | 80 | Y steps/mm | see above |
| $102 | 250 | Z steps/mm | |||||
| $110 | 500 | 5000 | 5000 | 6000 | 6000 | X Max rate, mm/min | Often, 6000 is also entered here. I still want to make a measurement to the real maximum achievable value. |
| $111 | 500 | 5000 | 5000 | 6000 | 6000 | Y Max rate, mm/min | |
| $112 | 500 | Z Max rate, mm/min | |||||
| $120 | 10 | 250 | 250 | 500 | 1000 | X Acceleration, mm/sec^2 | 1000 is often entered here. In my view, this is clearly too high. However, 500 is usually still possible. |
| $121 | 10 | 250 | 250 | 500 | 1000 | Y Acceleration, mm/sec^2 | see above |
| $122 | 10 | Z Acceleration, mm/sec^2 | |||||
| $130 | 200 | 410 | 410 | 380 374 (Pro Max) | 600 | X Max travel, mm | May vary according to conditions |
| $131 | 200 | 400 | 400 | 385 362 (Pro Max) | 600 | Y Max travel, mm | see above |
| $132 | 200 | Z Max travel, mm |
How can I determine the firmware version currently installed on the Sculpfun S10 to see if it needs to be updated?
It depends. Not all versions seem to report this. But usually, you can see a date string after connecting to the laser. This date gives a hint. If it is before 07-2022, you might upgrade.
How can I change the WiFi mode from AP to Station?
In which type of firmware? All Sculpfun firmwares do not support WiFi at all. Are you using FluidNC or MKS firmware?
Is this firmware compatible with s30 pro max?
Not really. I think it should be, but people reported that it does not work. I didn’t have the chance to try yet. I will post an update once I did. Maybe tomorrow.
I have the following laser equipment:
SCULPFUN S10 10W laser engraving cutter, 0.08mm high precision 32-bit motherboard (MKS ESP32/DLC32 CPU 32 bit).
Firmware version 1.1.2022072601
Is there a new firmware, that fits my 10W laser?
Sincerely
Finn Eriksen Denmark
Hi Finn!
I understand that you use the MKS DLC32 board? Then the only updates available are in the MKS GitHub repository. You can replace the firmware with the FluidNC firmware, if you want to go open source.
I have just assembled the S10 with 10w laser and sculpfun limit switches, motherboard DLC 32 v1.0.
No Firmware has been flashed to the machine as yet, and I’m not sure what firmware I need to load in for the motherboard & limit switches.
I’m using lasergrbl & Carveco software
My thanks in advance
Peter
Hi Peter,
usually, there is no firmware update required. Limit switches should work with every firmware version, the stock version as well.
Bonjour
Je possède une Sculptfun S9, par erreur j’ai effacé le Firmware mais quand je veux le réinjecter j’ai ce message :
(Impossible de se connecter au périphérique Espressif : délai d’attente de l’en-tête du paquet expiré)
J’ai essayé : changé les bauds, connectée avant et après ordi, moteurs branchés et débranchés, effectué un reset sur la carte toujours le même message.
Merci pour une aide SVP
Merci pour vos explications j’ai enfin réussi à réinstaller le firmware via :
Xloader et v1.1h-custom-S6S9v2.hex.
Je suis surpris que l’explication donnée par Scultfun ne fonctionne pas.
Encore merci.
Cordialement,
Henri Guillaudeau
That sounds great! Hope everything works fine now. If any questions are left open, let me know.
Hi Melvin.
Anna from Sculpfun after-sales service sent me a new board to replace the one that has been giving me some problems on my Sculpfun S9.
I followed your guide step by step on the subject and when trying to install the firmware but i during the process i get the message: “Failed to connect to Expressif device: Timed out waiting for packet header
What am I doing wrong?
Thank you.
Just answering here for completeness (was discussed via PM): seems the board is not recognized correctly, or the firmware is broken, and the bootloader does not work anymore.
Bonjour,
j’avais le même problème, j’ai fais ceci:
Réinstaller le firmware via :
Xloader et v1.1h-custom-S6S9v2.hex.
Cdt
HG
i need S30 pro max software, anyone can help me? thank you
You can download it right from this page. It’s in the S10+S30 section.
Hi,
Are you able to add Z-Axis support on the second X motor connector? 🙂
There is no second x-axis connector, there are two y axis-connectors. You can’t use those ports differently because they are controlled simultaneously. For a z-axis, you need a third stepper driver. No way around it.
🙂
Three is… for 90×90 option… (S30 Pro Max)
https://youtu.be/VQTG-pCLCgA?t=142
https://youtu.be/JIZa6yzob7k?t=288
Or maybe you’re right, please delete previous reply.. (and this one)
No problem. The S30 series mainboard unfortunately does not support a third stepper driver and therefore can’t drive a z-axis ever.
Ok, what about adding a Z-Axis driver? As a mod. If there is an ESP IC maybe there are pinouts available? I don’t even mind using some generic GCode firmware…
Eventually a completely external solution would also be acceptable. Use the frame, motors and blower…
You can use another mainboard. That’s no problem and easily done. Check here: https://diode-laser-wiki.com/documentation/extras/mainboard-replacement/
Hello Melvin,
Thanks for all the explanations. I followed the steps to setup the limit switch on my new S9 and after flashing the firmware the whole thing just did not work anymore.
Happily I found this page and the appropriate software here since mine has the latest motherboard (S30) or so I learnt with you.
Now the whole thing moves and works…. However after setting the values you kindly shared I still cannot make the homing work on lightburn…. the software send me this back:
ALARM:8
Homing fail. Cycle failed to clear limit switch when pulling off. Try increasing pull-off setting or check wiring.
If i push the limit by hand :
ALARM:1
Hard limit triggered. Machine position is likely lost due to sudden and immediate halt. Re-homing is highly recommended.
which makes me think it is not the wiring. But I cannot figure out how to get it to work now.
Any extra help would be extremely appreciated
Thank you in advance
The homing error is usually created if the controller recognizes the limit switches as activated constantly. If you send the “?” command in the console, do you see some output like “Pn:XY? Then the switches are recognized as pressed. You can invert the logic by setting $5=1. Then it should home fine.
Comments are closed.