If you are searching for information about an error / alarm message that you received in the console window, have a look at this article: grbl error codes.
Here I’d like to collect questions that are asked frequently in the communities I am participating. I hope it will grow over time and answer most questions.
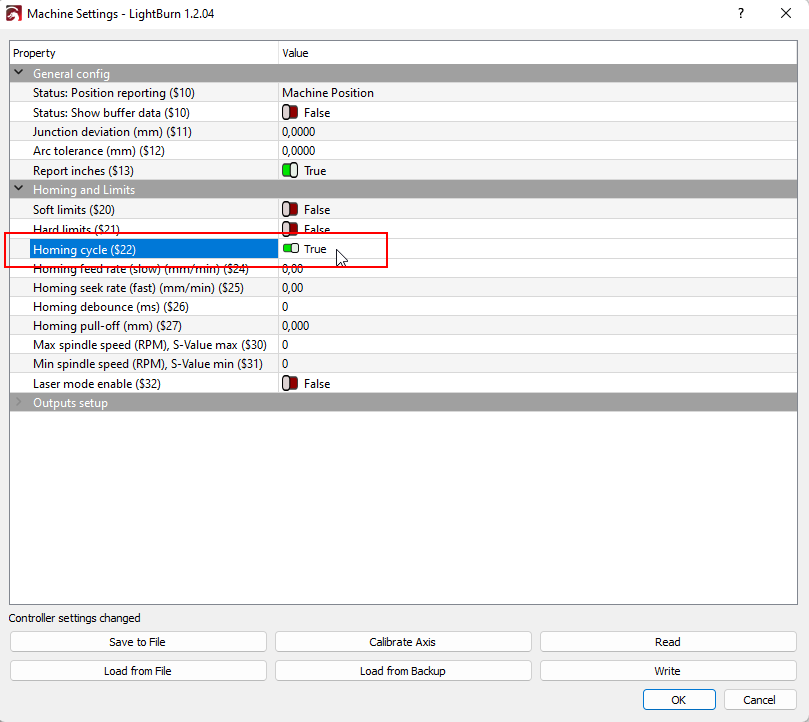
What does “error 5” mean? How to remove it?
After setting up the laser in LightBurn, many users have the problem that they get the following error in the console:

Strictly speaking, this is not an error and does not affect the function of the laser. The message says that a command for automatic homing was sent to the laser, but this function is not activated in the laser at all. This is also correct because for this, you need limit switches, which are not in the scope of supply of the laser. More information about this can be found in the chapter about Limit Switches.
To remove the error message, it is sufficient to deactivate the automatic homing in the device settings in LightBurn:

If you have limit switches, then the function is not activated in firmware. To activate it, send “$22=1” in the console or using the machine settings:
Should / can I always operate the laser at 100% power?
This is also a frequently asked question. Basically, you can say the following: It is not related to the power, but to the temperature. According to most manufacturers, the modules have a service life of around 10,000 hours. Some also state significantly more. This number should actually have been measured at 100% power. Whether this has happened is of course questionable. On the other hand, this will have been tested under laboratory conditions. The diodes are not supposed to be operated above 25 °C, and they age strongly when they get warmer. So, if the ambient temperature is kept consistently lower, it should not be a problem for the diode to be operated at full power. It should be noted here that the diodes are only cooled with ambient air. So if you already have an ambient temperature of 30 °C, you will damage the diode anyway, regardless of what the power is.
There are also some sources on the subject. A relatively well-known picture is the following, there you can see, if you reduce the power (current) of the diode, you can achieve a multiplication of the lifetime. Here is a better explanation from Michael (Facebook): “The average range of laser life is 25,000-50,000 hours. The more you use it at 100% lessens the life at a factor of n, which is 1.5. So for the amount of time run at 100% it lessens the laser life at 150% rate of life usage. So if you run at 100% for 1 hour, it lessens the life of the laser at 1 hour and 30 minutes. Running 25k hours at 100% all the time, the laser life would be half of 25k.”

There are also some other sources on the net about this. There you can find statements like “If the laser is operated at a temperature higher than the recommended temperature, the lifetime of the laser decreases exponentially when the operating temperature rises above the recommended temperature. Degradation of diode lasers accelerates with increasing temperature. For many laser diodes, operating at a lower than recommended temperature can slightly increase output power (higher efficiency) and/or improve lifetime” [source]. And this PDF. Here is another article (in German): Lifetime of diodes.
It is therefore obvious that at normal ambient temperatures between 20 and 30 °C, the temperature of the diode can quickly rise above 25 °C and lose lifetime duration. So, it makes sense not to operate the diode at full power all the time. However, you can also ask whether you can reach the full lifetime at all (calculated with hobby use). The question can hardly be answered finally because general maintenance (e.g., cleaning the lens and the fan) also have a strong influence and one can rarely reconstruct the exact circumstances at which a diode died.
The laser stops during operation
As mentioned in the beginners guide, the movement commands are sent as a continuous stream. If some commands are corrupted or lost, the laser might go into error states. Check the USB cable and use a high-quality one. Additionally, it should be as short as possible. You can also try to use another USB port.
In the following screenshot, you can see transmission errors right at the top of the first line. The black question marks represent characters that were not transferred correctly and cannot be processed (the other errors in the image have nothing to do with this here).

Other reasons for transmission problems:
- The control PC has gone into standby mode -> check power settings.
- Other devices have been switched on, causing strong interference, e.g. a vacuum cleaner on the same line
If such errors persist, you can also try to ground the laser frame and housing.
The job has been interrupted. Can I resume?
This is a constant question, since bad USB cables are often used and the connection to the laser is briefly interrupted. In that case, the job is stopped and cannot be continued directly. With the following procedure, you can at least try to continue at the same point. This is valid for LightBurn, for LaserGRBL it is a bit more complicated.
First, you should note the time when the job was interrupted. LightBurn shows this at the progress bar. In addition, the laser head should not be moved! Afterwards, one makes sure that the start position is “current position”. Open the preview window of LightBurn. There, you move the slider to the position / job time when the job was interrupted. Afterwards, you click on “Start here”. Now the laser should continue as exactly as possible at this position.

In LaserGRBL you can remember the last Gcode line, save the project as Gcode, find the corresponding line there and delete the content before it. Then you should also continue at this point. But I haven’t really tested this in practice yet. The procedure works theoretically also in LightBurn, however in the console the complete output is deactivated as standard, so that one cannot see the last Gcode commands.
The lasered result is smaller / bigger than intended
This is mostly caused by a wrong firmware setting for the steps/mm value ($100, $101). Check basic principles for a more detailed explanation.
I’m running at full power but still nearly no / less effect
This might be caused by a wrong setting for the s-value. Latest grbl versions use a value from 0-1000 for min to max power. Older versions used 0-255. If you are still stuck with old settings, the maximum value that is sent to the laser is about 1/4 of the real maximum. You need to change this in your control software.
Which diode laser should I buy?
Hard to answer. In general, you can buy any laser if you are willing to invest time and learn. Be careful, the advertising texts are full of misleading information. E.g., power is often given as the total system power (like 60W laser) but the actual optical output of the laser module is normally around 5W, sometimes 4.5W, sometimes 5.5W. Never higher.
You need to be aware of the safety aspects and know that none of the machines below €1000 is meant to be a production machine. They are all toys. You must invest time to get the best out of them. If you like to have the least effort, select a machine that is already shipped with end stops (e.g., Ortur Master 2 Pro). Personally, I can recommend the Sculpfun lasers because I have experience and like them. If I started over now, I would select the S9 over the S6 because the laser is one step better.
Nearly all competitors (Atomstack, Sculpfun, …) use the same mechanics and control electronics. They differ most in the laser head. Since you can exchange the laser head between most lasers, it doesn’t even less matter which one you choose. If the laser is too weak, just add a new head (e.g., add a Sculpfun S9 head to an Atomstack frame). In rare cases you need to adjust the wiring and if you use a much more powerful laser, you might have to upgrade the power supply as well.
Which rotary roller should I buy?
This is another difficult question because it depends on your requirements. But technically, you can add nearly any rotary device to any laser (as long as it is driven by a stepper motor, which is the case of all I have seen so far). You might need to adjust the wiring, but that’s all. So, you should look after a device that fits to your requirements like the maximum size of objects of if you can adjust the frame to take tapered objects (like most drinking glasses).
How do I enable the laser fire button in LightBurn
This is a very handy function that allows you to draw a frame around your object with the laser at very low power so that you can see where your project will be located. This is disabled by default in LightBurn, you need to enable it within the device settings:

Now you have the “Fire” button in the “Move”-window (where you can set the desired percentage for this function, e.g., 1%, when set to 0, the laser does never turn on while framing!). Now, you can shift+click on the “Frame” button in the laser window to draw the frame around your object with the laser turned on.
Update:

The laser is not turned off between objects, connecting them with a thin line
The laser mode is not activated in the firmware. You need to set the parameter $32=1 (see page about firmware if you don’t know how to do it). If it is set to 0, the laser is treated as CNC machine where the spindle stays on during moves but is retracted in those cases.
Check if the laser module itself is still working
Sometimes the question arises whether the laser module or the software / firmware is to blame for too weak laser power. To check this, you can plug the laser cable (red connector with one pin occupied) into the 5V connector once. Then the laser should turn on with full power as soon as you turn it on. ATTENTION: you can’t switch off the laser then, only with the main switch. So take precautions before (align laser already, fireproof base etc.).


If the laser module works like this, the next thing to check is the firmware settings. The following values are sometimes adjusted and cause the laser to malfunction:
- $30 (max spindle speed) should be 1000
- $31 (min spindle speed): 0
- $32 (laser mode): 1
How long can I run the laser continuously?
This is another common question. My answer is: there is no limit regarding the continuous runtime. If the laser runs fine for an hour, it will do for another 100 hours as well. As long as the environment temperature does not change (increase), the laser will be fine. After one hour of operation (and much less already) the temperature inside the module won’t change anymore. Then it doesn’t matter how long this continues. But be aware that the overall temperature of the diode plays a major role in the lifetime of it. So, try to keep the temperature of the diode (and the environment) as low as possible for long-time usage.
How do I change the material thickness within a project file
This is usually not always very easy and can also require manual adjustments. In the meantime, however, LightBurn has developed a function for this that makes it very easy to change the material thickness, at least for simple geometries: the Slot+Tab Resizer.
Here are two nice videos (one in German, but you can turn on translated subtitles)
It is important that the files or shapes are properly designed for this. If not all slots are recognized correctly, the following can help. The shape is repaired using the “Optimize Selected Shapes” tool, after which resizing also works:


How can I remove doubled lines when tracing objects in LightBurn?
Short answer: not at all. LightBurn uses an edge tracking algorithm that does not allow to detect only the center line instead of the two edges. This cannot currently be integrated for licensing reasons.
LightBurn’s current trace feature is a licensed library called PoTrace, which is the same thing used in InkScape for their non-centerline mode. PoTrace doesn’t have a centerline mode, so AutoTrace is what InkScape uses for centerline mode, but it’s only available as open source, with no commercial licensing option I’m aware of, and as Adam says, it’s been abandoned for quite a long time.
So if you want to import a graphic and convert it to vectors that should be single lines in LightBurn, then you have to use Inkscape for that. Here you can do this with the autotrace function.
The procedure is shown in the following images. In Inkscape, the graphic is imported normally into an empty file. Then the graphic is marked and Paths ⇾ Trace Bitmap Trace is selected. In the following dialog, select “centerline trace (autotrace)”. Now you get the line drawing (be careful, it is under the imported graphic, you have to move it to the side). Afterward, save the whole thing as SVG. Now you can import it into LightBurn and you have the single line object in your project.


How to align an object parallel to the floor in LightBurn?
For a long time, I thought that the function did not exist in LightBurn, but it does. You can align objects not only parallel to the ground or perpendicular, but also 45 degrees. Depending on what is closer, is automatically selected.


TO BE EXTENDED
Can’t find your answer? Let me know, and we’ll fill this section further. Leave a comment or drop me an email: diy@melvin-isken.de